<style>
details {
margin-top:0.5em;
}
summary {
//font-weight: bolder;
}
summary:hover {
text-decoration: underline;
}
blockquote {
font-size: 16px;
}
.todo {
color: #ff00ff;
border: 2px dashed #ff00ff;
padding: 0em 1em;
border-radius: 5px;
margin-top: 1em;
margin-bottom: 1em;
//display: none; // UNCOMMENT TO HIDE TODOs
}
</style>
**[« Back to the main CS 300 website](https://csci0300.github.io)**
# Lab 0: Getting Set Up (*Docker & Git*)
### Due Tuesday, January 27th, at 8:00 PM EST
---
# Introduction
Welcome to your first lab! The main focus will be to get you set up with the tools we'll be using throughout CS 300, and give you an intuitive understanding of each tool.
The main tools we'll be using are **Docker**, a convenient way to manage virtual environments as "containers", and **Git**, the most prominent version control software.
| Tool | Use |
| -------- | -------- |
| **Docker** | Software environment virtualization |
| **Git** | Version control software |
| **GitHub** | Online code storage and version control |
## Why are we using these tools?
* **You'll be able to develop locally.** With virtualization, we can specify a standard development environment on any machine, so your code will work no matter where it's run. (_You won't need to log into the CIT department machines to write, test, or hand in your code. However, you **can** use the department machines if you want; read on._)
* **Version control is awesome.** All changes to your code are tracked and can be reverted, making testing and debugging significantly more bearable. Your changes are also semi-automatically merged with other people's, making collaboration easy. CS 300 has no partner assignments, but version control will be useful for other courses that do.
* **It's how it's done in the industry.** Most companies use some form of version-control in order to better manage projects and collaboration, and use machine virtualization and containers for easier deployment and testing.
<details><summary>What if I don't have my own computer?</summary>
>
* For students who don't have access to their own laptop, the [Brown IT Service](https://it.brown.edu/services/loaner-laptops-cameras-and-projectors) provides loaner laptops for free.
* Please contact us if you have any issues working on your own computer or cannot obtain a computer.
* Our development environment (the "course container") and assignments work on the department machines, so you can always use machines in CIT to do your work if necessary. If you are interested in this option, see **[this section](#Using-department-machines)** for some special instructions to follow as you read the rest of this guide.
</details>
<br />
:::warning
**Note:** If you run into issues with your Docker at any point during the course, please reference the [Docker Debugging Guide](https://csci0300.github.io/assets/docker.html) under the Resources tab on the course website.
:::
# Development Environment Setup
Your computer is probably running Mac OS X, Windows, or Linux! These different _operating systems_ all come with different libraries and preinstalled software. This difference makes it difficult to get reproducible results in a well-known environment for class assignments.
In this class, we will use a **container**, a technology that emulates an operating system (OS). The container runs a Linux-based operating system, **Ubuntu**. Our grading server also runs a Linux-based OS (Debian), so if your code works in the container, it will work on the grading server.
<details><summary>(Optional reading) <strong>Virtual machines vs. containers</strong>?</summary>
We will talk about this in the OS section of the course. But if you're curious, [here](https://www.backblaze.com/blog/vm-vs-containers/) is a more detailed walk-through of the differences between a Virtual Machine and a container.
</details>
<br />
Throughout this lab and the class, you'll be interacting with the Linux terminal quite frequently. [Here](https://missing.csail.mit.edu/2026/course-shell/) is a good tutorial on the subject if you're unfamiliar with it.
## Docker
[**Docker**](https://www.docker.com) is one of the most popular container solutions and widely used in industry. In CS 300, we use Docker because it lets you run a course container on Windows, macOS, or Linux.
::::success
**Task**: Download and install Docker.
You may download Docker [here](https://www.docker.com/products/docker-desktop). On Linux machines, follow the instructions [here](https://docs.docker.com/engine/install/ubuntu/).
> **Already have Docker installed?** If you already have Docker on your system (perhaps from another course), we recommend that you reinstall or upgrade now to get the latest version. Old versions of Docker can sometimes cause issues, so this is a good way to avoid problems later!
After downloading Docker, follow Docker's instructions to install it on your OS. Accept if Docker asks for privileged access.
On Windows or macOS, open the *Docker Desktop* application after it has been installed. You may see a message similar to "Docker Desktop is Starting...". Once this message goes away, your Docker has started successfully!
<details>
<summary><img src="https://csci0300.github.io/assign/labs/assets/windows.png"> <b>Click for extra instructions for Windows-based systems</b></summary>
To run the following steps in this lab, you will need to set up Windows Subsystem for Linux (WSL). WSL should already be enabled after you install Docker, but you may still need to install a Linux distribution. This will run in an actual Linux VM, and you will run your Docker container within that VM (turtles all the way down for you!).
#### Setting up WSL
To set up WSL, do the following:
1. **Verify that Hyper-V/Virtual Machine Platform is enabled**
- Hyper-V/Virtual Machine Platform are Windows's hardware virtualization products, which may be required to build containers, use WSL, and install Docker. To verify that these are enabled, go to Settings > Apps > Optional Features > More Windows Features, and verify that the boxes for "Hyper-V" and "Virtual Machine Platform" are checked. (If they are not present, do not worry about them). From here, follow the system prompts. Proceed to step 2.
2. **Do I have a Linux distribution (Linux distro) installed?**
- Open a terminal (either Windows Terminal, Powershell, or Command Prompt) and run `wsl -l -v`. If there is only "Docker Desktop" and "Docker Desktop Data", you do not have a Linux distribution installed. Proceed to step 3.
- Otherwise, you have a Linux distro installed. Proceed to step 4.
3. **Install a Linux Distribution.**
- Run `wsl --set-default-version 2` to ensure Ubuntu will be installed under WSL 2.
- Install "Ubuntu" from Microsoft Store. (link [here](https://apps.microsoft.com/detail/9pdxgncfsczv))
- Click "Open" after Ubuntu is downloaded. A terminal will open and guide you through the installation process.
4. **Ensure your Linux Distribution runs on WSL 2.**
- From the output of `wsl -l -v`, find out if your Linux distro is using WSL 1 or WSL 2. If it's WSL1:
- Run `wsl --set-version <distro name> 2` to update your distro to use WSL 2.
5. **Set your default Linux distro**
- Run `wsl --setdefault <distro-name>` to configure your default Linux distro. `<distro-name>` should be "Ubuntu" or "Ubuntu-xx.xx" if you installed using step 2.
#### Using WSL
Now that your WSL has been set up, here's how to use it. You'll need to do this whenever you need to use your development environment:
1. **Open a terminal (either Windows Terminal, Command Prompt, PowerShell), enter the command 'wsl'**. You should see your terminal prompt change to looking something like this:

This is your WSL terminal! You can think of WSL as like a separate Linux computer that lives inside your host system--this is used to run Docker, which runs the rest of our course environment (turtles all the way down!).
:::danger
**Warning: If your WSL terminal starts with `root@` instead of your username**, you will need to configure some extra settings in your WSL installation before continuing. See [this section](#Configuring-a-WSL-user) for instructions, and feel free ask us if you have questions or run into issues.
:::
2. **If the WSL terminal prompt says something like `/mnt/Users/...`, run the command `cd ~`** to switch to your *WSL home directory*. The WSL home directory is a place within WSL where your files will be located--you'll see more of what this means as you follow this lab.
3. Next, you will need to connect Docker with WSL. To do so, open your Docker Desktop's settings (on its top right corner), click "Resources", "WSL integration", then enable integration with your Linux distro. Then, click "Apply and Restart".
Yay, your WSL should now be set up!
:::warning
:warning: **Going forward, there are two super important things things you need to know about WSL**:
1. Throughout the course, whenever you need to run any commands related to Docker or your course container (which you'll see in this guide), you need to enter a WSL terminal first
2. Any files you create inside WSL get stored in a special folder on your host system. We'll show you how this works in the section on [Shared Folders](#Shared-Folders)
:::
Enter `wsl` in your Command Prompt or Powershell, and you'll enter into your WSL! For the rest of the lab, run commands within your WSL Linux environment, unless otherwise specified.
</details>
<br />
Verify Docker is installed by executing the following command in a terminal:
```shell
$ docker --version
```
A Docker version number should be printed.
After installing Docker, a Docker process (the Docker daemon) will run in the background. Run the following command to verify:
```shell
$ docker info
```
This should print some information about your Docker installation.
If you see the following error:
```shell
ERROR: Cannot connect to the Docker daemon at unix:///var/run/docker.sock. Is the docker daemon running?
```
it means Docker hasn't started running yet. On Windows or macOS, ensure your Docker Desktop is running. On Linux, try the command `sudo systemctl docker restart` in a terminal.
If you're running into other problems while setting up Docker, check out our [Docker debugging guide here](https://csci0300.github.io/assets/docker.html)!
::::
## Set up CS 300 Docker Environment
In Docker, an environment is defined as a **Docker image**. An image specifies the operating system environment that a container provides. An image can also contain additional software dependencies and configurations.
Next, you will download the the course's setup code and create the CS 300 Docker image!
<details>
<summary><img src="https://csci0300.github.io/assign/labs/assets/apple.png"><b>Initial instructions for macOS users</b> </summary>
If you're running on macOS, you will need to install a set of Apple-recommended command-line tools via the following command:
```xcode-select --install```
This ensures that your computer has installed `git`, a program we'll use below. Alternatively, you may also download and install `git` directly, following instructions [here](https://git-scm.com/download/mac).
</details>
<br />
:::success
**Task:** Do the following to set up your development environment:
1. Open a terminal in a directory on your computer where you want to do your coursework:
- :warning: **Windows users**: open a WSL terminal (e.g. terminal type "Ubuntu") and change to your WSL home directory (type `cd ~`)
- :warning: **Mac users**: If you use iCloud, we strongly recommend you **use a folder that does not sync with iCloud**, which can cause random issues throughout the semester. To do this, we recommend starting from your main user folder (i.e., the folder that holds your Documents/Downloads/Desktop folders). For example:
```
# Example: go to your home directory before starting
you@your-mac:~$ cd ~
```
Optionally, you can setup your environment in any other folder you like, so long as it doesn't sync with iCloud.
<!-- <details><summary> <b> See instructions for Mac users with iCloud</b></summary>
From a terminal on your mac, run the following commands:
```console
# Go to your home directory with `cd`
you@your-mac:~$ cd ~
# Make a folder called `cs300`
you@your-mac:~$ cd ~
# Enter your new cs300 folder!
you@your-mac:~$ cd cs300
you@your-mac:~/cs300$ # <-- Prompt should now show cs300!
```
</details> >
-->
2. Then, enter the following command to download our [development environment](https://github.com/csci0300/cs300-s26-devenv) to the new subdirectory, `YOUR_DIRECTORY`. Choose your own name (e.g., `cs300`) instead of our placeholder `YOUR_DIRECTORY`.
To do so, replace `YOUR_DIRECTORY` in the git command below with whatever you choose:
```console
$ git clone https://github.com/csci0300/cs300-s26-devenv.git YOUR_DIRECTORY
```
This command clones a GitHub repository onto your computer; we will explain the details of Git and cloning later in this lab.
2. Run `cd YOUR_DIRECTORY` to enter the directory you have just created (e.g., `cd cs300` if you called your directory `cs300`).
3. Inside this folder, do the following:
```console
$ ./cs300-run-docker setup
```
`./cs300-run-docker setup` downloads your Docker image, which may take a while. (It's normal for this script to run for up to 15 minutes.)
You can ignore messages about logging into your Docker account or scanning for vulnerabilities!
:::
<details><summary>Why are there two Dockerfiles?</summary>
You may notice that there are two Dockerfiles in the `docker` folder: `Dockerfile` and `Dockerfile.arm64`. Why are there two Dockerfiles, when CS 300 only uses one container?
Machines run on different architectures, and we will explore that in our course during the semester. Computers that use an Intel chip runs on Intel's x86 architecture. Recent Macs released by Apple begin to use Apple silicon, which run on the ARM architecture.
Different architectures use different sets of CPU instructions. Therefore, programs running on different architectures need to be compiled differently.
Some CS 300 projects are designed to run on the x86 architecture. When running these projects on a different architecture (e.g., on an Apple M1 machine), they must be **cross-compiled** to use x86 instructions.
For students running on ARM machines, our scripts use `Dockerfile.arm64`, which installs additional packages to compile x86 binaries on an ARM machine. Other students, running on chips that use the x86 architecture, use `Dockerfile`.
</details>
## Entering the container
Once you created your Docker image, you will want to create a container running this image.
:::warning
**⚠️ Warning: Renaming or moving the development environment ⚠️**
If you can, please avoid renaming or moving the folder containing your CS 300 development environment after this step. Doing so will require you to create a new course container because Docker stores some path names in its internal data, and renaming the folder breaks those paths.
:::
:::success
**Task:** Enter your container and explore it by running a few commands. Then, exit the container by `exit`, or Ctrl-D.
<img src="https://csci0300.github.io/assign/labs/assets/windows.png"> **Windows users: if you get errors**, see the Windows-specific instructions below.
<br />
**Make sure you're inside directory `YOUR_DIRECTORY` (e.g., `cs300`) when running the command below.**
```console
$ ./cs300-run-docker # enters your Docker container
cs300-user@9899143429a2:~$ # you're inside the container!
cs300-user@9899143429a2:~$ uname
Linux
cs300-user@9899143429a2:~$ echo "Hello world!"
Hello world!
cs300-user@9899143429a2:~$ ls -lah
total 24K
drwxr-xr-x 6 cs300-user cs300-user 192 Jan 25 22:23 .
drwxr-xr-x 1 root root 4.0K Jan 25 22:25 ..
-rw-r--r-- 1 cs300-user cs300-user 132 Jan 25 22:23 .bash_profile
-rw-r--r-- 1 cs300-user cs300-user 4.0K Jan 25 22:23 .bashrc
-rw-r--r-- 1 cs300-user cs300-user 25 Jan 25 22:23 .gdbinit
-rw-r--r-- 1 cs300-user cs300-user 813 Jan 25 22:23 .profile
cs300-user@9899143429a2:~$ exit # or Ctrl-D
```
Don't worry if the number after `cs300-user` is different. This is an identifier that uniquely identifies this container.
You may run any Linux commands inside this container. To exit, enter `exit` or use Ctrl-D.
:::
<details>
<summary>
<img src="https://csci0300.github.io/assign/labs/assets/windows.png"> <b>Windows users: if you encounter errors</b></summary>
If you see errors along the lines of `bash: '\r': command not found` or `bash: /home/cs300-user/.bash_profile: line 5: syntax error: unexpected end of file` when you enter the container, you need to convert your files' line endings (characters that delineate the end of a line) from Windows to UNIX (Linux) format.
To do so, do the following:
1. Enter into WSL. You may do so by opening Ubuntu in the start menu or through the `wsl` command.
2. Use `cd` to navigate to the folder where you just cloned the setup repository. If you cloned your setup repository to your C: drive, use `cd /mnt/c` to enter the C: drive from your WSL.
3. Run `sudo apt-get update`, then install `dos2unix` with `sudo apt-get -y install dos2unix`.
4. Run `dos2unix ./cs300-run-docker` (you should only need to run this once).
5. Next, run `./cs300-run-docker`.
6. If you see the next line begins with `cs300-user@@9899143429a2:~$ ...`, you're inside the container, hopefully without errors!
</details>
## Shared Folders
"_If my Docker container is a separate (virtual) computer than my laptop, how will I move files between the two?_", you may ask. Great question! You'll move files between the two in any of the ways you can move files between any two computers! (Bear with us!)
To get files to and from department machines, you may have used things like **`scp`**, **`sftp`**, and **Cyberduck**, which allow you to copy files over the network. These work, but are inconvenient if you're constantly moving them back and forth. (**Git** would technically also fall under this category, even though it's fancier, as you'll find out shortly.)
If you're lucky, you may have been exposed to **FUSE** and **`sshfs`**, which allow you to _mount_ a filesystem over the network. This allows your computer to navigate the remote files as if they were stored locally, which means any changes you make are happening on both ends automatically.
Inside of the container, your home directory (`/home/cs300-user`, or `~`) is actually a mount of the `home` directory inside your development environment directory (i.e., `YOUR_DIRECTORY` from earlier, such as `cs300`). Any changes you make in one will be visible in the other.
:::warning
<details>
<summary><img src="https://cs.brown.edu/courses/csci0300/2023/assign/labs/assets/apple.png"> <b>Important extra setting for macOS users: change filesystem sync configuration</b></summary>
Many students have reported issues with syncing files in their mounted home directory issues on MacOS. This might be caused by gRPC FUSE, the default file system sharing implementation of Docker.
**To resolve this**, go into your Docker settings and make sure that the sync method is set to `VirtioFS`. **[Look here for detailed instructions on how to do this](#Filesystem-Performance-on-Macs)**.
</details>
:::
<br />
::::success
**Task:** To try out using shared folders, do the following:
1. **Open a new terminal *outside* of your container** (ie, one that doesn't start with `cs300-user@...`) and go into your `[YOUR_DIRECTORY]/home` folder. (On Windows, make sure you're using a WSL terminal.) Then **create a file and a folder**--here's an example for how to do this:
```console
$ touch cool_file
$ mkdir awesome_folder
$ cd ..
$ ./cs300-run-docker
```
2. Now go back to your container terminal, run `ls`. The command `ls` lists the contents of your current directory (which is your home folder). **This should show you the files you just created!** Here's what it should look like based on the example in the previous step:
```console
cs300-user@9899143429a2:~$ ls # print the file and dir we just created
awesome_folder cool_file
```
3. The sharing process works both ways: when you modify files in the container's home folder, the changes are visible on your host. To see this, we can delete one of the files we just made, and make a new file and folder, like this:
```console
cs300-user@9899143429a2:~$ rm cool_file
cs300-user@9899143429a2:~$ cd awesome_folder
cs300-user@9899143429a2:~$ touch even_cooler_file
cs300-user@9899143429a2:~$ exit # or just CTRL-D
```
4. When you exit the container again, you should now see your modified files:
```console
$ cd home # this enters the mounted directory
$ ls # should just show awesome_folder
awesome_folder
$ cd awesome_folder
$ ls # should show even_cooler_file
even_cooler_file
```
This is so you get a feel for what is going on, since you'll be using this on a regular basis!
<br/>
:::info
<details>
<summary>
<img src="https://csci0300.github.io/assign/labs/assets/windows.png"> <b>Windows users: important note on how to find your files</b></summary>
When you are using WSL, your files live in a separate folder that is part of WSL, and is separate from your normal user folder on your host system. To access your files from outside WSL (e.g., how you normall move files), you can do the following:
1. Open a WSL terminal. If you're inside your container environment exit it by typing 'exit' (or open a new terminal tab instead).
2. Run the command `explorer.exe .`. This should open up a file explorer window in the same directory as your terminal, and should show you your files!
</details>
:::
:::warning
<details>
<summary><b>Warning</b>: If you ever need to move or rename your development environment folder...</summary>
Your Docker container will still try to mount to the original path, even after you rename, remove, or move the folder `YOUR_DIRECTORY`.
After moving your development environment folder, you'll need to delete the old container and start a _new_ container. You can do so with:
```
./cs300-run-docker --clean
```
You should be able to enter a container, and see all of your work now!
::::
# Text Editors and IDEs
What development environment or editor to use is a question that divides people and has led to countless hours being wasted on heated discussion, offline and [online](https://en.wikipedia.org/wiki/Editor_war) for decades. Some people prefer very simple editors that run in their terminal, while others prefer graphical integrated development environments (**IDEs**). For CS 300, we don't really care what you use -- if it works for you, great!
To make your life easier, however, you probably want to use an editor with syntax highlighting for **C** and **C++**, the main programming languages we'll use in CS 300.
You can edit your source code inside the course container, or on your normal operating system. Recall that the home directory inside the container is a mount of your local `cs300/home` directory (or whatever you named it). This means that you can install any editor or IDE of your choice on your **local machine**, edit your files and work on your assignments locally, and all of your changes will be reflected in your container! You can then compile, build, and run your assignments inside your container. This is the power of mounting :fire:!
There are plenty of great choices for text editors. If you're not sure which one to install, we recommend [**VS Code**](https://code.visualstudio.com/). It has very nice integration with our Docker container, and it's nicely customizable with extensions.
## VS Code Configuration
*If you prefer another editor, you can skip to [Other editors](#Other-editors).*
To connect VS Code to your course developer environment, do the following:
#### Attaching VS Code to your container
1. If you don't have VS Code already installed normally on your computer (not inside the container), download and install it now.
2. Open VS Code as normal and navigate to the **Extensions** menu in the sidebar. (See the figure below to find it.)
3. Search for and install the **Dev Containers** extension, if it is not already installed. Here's what it should look like:

4. Make sure your course container is running (Either by connecting to it with `./cs300-run-docker`, or checking the Docker Desktop app).
5. In the bottom-left corner of your VS Code window, click the blue/green button and select **Attach to Running Container**. In the menu that pops up, select your course container.

Once you attach to your container, VS Code should open a new window, which should show `cs300` at the bottom, like in the figure below. This is a separate instance of VS Code, which lives inside the container. Any new files you edit or commands you run from this VS Code window will be run inside the container!

6. Your new container-based VS Code may take a moment to set itself up. When this finishes, open the **Extensions** menu again and **install Microsoft C/C++ extension pack** to set up helpful features like code completion, syntax highlighting, etc.
#### Testing your VS Code install (IntelliSense)
Before continuing, it's important to make sure your VS Code can properly parse C/C++ files, which is called IntelliSense. This lets VS Code give provide autocomplete, and underline syntax errors. To do this:
1. In your new, container-based VS Code (which says `cs300` in the bottom-left), create a new text file called `test.c`: **File** > **New File...** > type the name `test.c`, and press **Enter**. <br />VS Code may ask for a location to make the file--it can be anywhere inside `/home/cs300-user` (we're not even going to add anything to it, we just need a blank file).
2. If VS Code prompts you to install **"C/C++ extensions"**, click **Install**. This will add support for useful features like syntax highlighting, completion, etc.
::::danger
3. :eyes: **Don't skip this step!** Many systems encounter an error at this step that can be hard to spot: look for an error box in the bottom-right corner of VS Code that says `cpptools client: couldn't create connection to server`, like this (see instructions for fixing it below):

<br />
:::warning
<details><summary><b>⚠️ If you get this error, click here for instructions</b></summary>
This error can occur because the VS Code C/C++ extension sometimes sets itself up with incorrect permissions, and then VS Code can't start it properly. We can fix this by making your files within the `/extensions` directory executable, which allows VS Code to run it like a program.
To fix this:
1. Open the VS Code terminal, or go to any other terminal inside your container (it should start with `cs300-user`)
2. Run the following command:
```console
chmod +x -R /home/cs300-user/.vscode-server/extensions/
```
3. After the command finishes, **restart VS Code**. If VS Code doesn't re-open itself inside your container, you will need to [attach](#Attaching-VSCode-to-your-container) it again--make sure the bottom-left corner says `cs300`.
</details>
:::
::::
3. Finally, we need to check VS Code's parser. In the bottom-right corner of the VS Code window, **click on the box that says "C" or "C++"**. (There should be an icon next to it--either a `{}`, or a spinning wheel.) This is the *IntelliSense menu*, which should look like this:

Make sure the IntellSense menu says **IntelliSense: Ready** and **Parsing Complete**, like in the picture. If it still says "scanning workspace...", try waiting a minute for it to finish.
If your IntelliSense menu looks okay, your VS Code should be all set, yay! :sunglasses:
If the menu still says "scanning workspace", try waiting 1-2min for it to finish (you can continue with the lab while you wait). If it still doesn't work, try the fix in the red box if you haven't already.
**If you still have issues**, you can keep working on the lab and other assignments, but please follow up with us on EdStem or in office hours. We want to make sure you have a good set of tools!
### A note on AI features
VS Code, like many modern IDEs, has integrated AI features, such as Microsoft's Copilot. These are exciting and powerful additions to a software engineer's toolbox, and your instructors and course staff regularly use them in their everyday work.
AI tools can save a lot of time and make development easier. **But in the setting of an introductory computer systems course like CS 300, they can also seriously harm your learning.** In particular, CS 300 assignments try to teach you computer systems concepts using simple but realistic examples that match real-world scenarios, which are well-documented on the internet. As a result, AI tools are very good at completing the course assignments' tasks, and Copilot and similar tools will often inadvertently reveal the next step to you without requiring you to think. This may be convenient, but it means you lose out on what the assignments try to get you to do: to think about how the concepts from the course translate into code.
You might wonder why it's necessary to know these things, given that AI might be able to do much of the coding for you in the future. _But using AI tools effectively still requires you to understand the underlying concepts, and there is no better way to solidify your understanding and practice engaging with the concepts than writing code yourself._
**Consequently, we strongly recommend that you disable AI features in VS Code while you work on the course assignments.** The easiest way to achieve this is to disable the "Github Copilot Chat" extension for your workspace. We provide configuration files within the stencil code we give you for labs and projects that already do this for you, but if Copilot comes back, please disable it again. You are welcome to use it for other courses or projects, and disabling it within the _workspace_ only won't affect your use of VS Code outside this course.
::::danger
**Note:** _CS 300's [AI policy](https://csci0300.github.io/syllabus/#coll) prohibits you from asking AI tools to write code for you and disallows copying code produced by AI into your solutions._
As such, all of the following are violations of academic integrity and the course policy:
1. Using agentic coding frameworks (e.g., Claude Code) to do assignments for you.
2. Using Copilot to write code for you (e.g., via inline suggestions/tab completion in VS Code).
3. Using IDEs that deeply integrate AI features that write code for you (e.g., Cursor and similar IDEs).
4. Putting the assignments into AI chatbots and asking them to write code for you.
You are welcome to use AI tools and chatbots to explain code (e.g., the stencil) or concepts to you, as well as to debug your own code. But, for your own good and learning, we require you to write your own code.
::::
### Other editors
If you prefer another editor, here's a list of some of the most popular editors. All of them are fully compatible with CS 300:
<details><summary><b> Click to expand</b></summary>
**Simple editors**:
* [**`vim`**](https://en.wikipedia.org/wiki/Vim_(text_editor)) is a classic, highly configurable editor that comes with many Linux distributions. It's a _multi-mode_ editor, meaning that you have to switch between modes (e.g., input, select, edit). It runs in the terminal, all functions are controlled by keystrokes and internal commands, and vim can be customized with plugins.
* [**Sublime Text**](https://www.sublimetext.com/) is a lightweight, cross-platform editor highly customizable via plugins and with a strong fulltext search.
**IDEs**:
* [**(Recommended) VS Code**](https://code.visualstudio.com/) is a free IDE built by Microsoft, and has support for all major languages (including C and C++). It also comes with built-in Git integration. Runs on macOS, Linux, and Windows, as well as connection options to the class VM.
* [**CLion**](https://www.jetbrains.com/clion/) is a cross-platform IDE built by JetBrains specifically for C and C++ development. It helps you with code navigation, generation, and refactoring. Students qualify for free licenses. Runs on macOS, Linux, and Windows.
* Note that CLion is sometimes finicky to set up and configure however.
* [**XCode**](https://developer.apple.com/xcode/ide/) is Apple's official free IDE for Mac and iOS app development, and supports C and C++ (in addition to various other languages). Runs on macOS.
</details>
## Installing programs on Linux (in your course container)
Our containers come with a few programs pre-installed, but what if we want more? With a text-based interface like the command line, it's quite difficult to navigate the web and find a suitable download link. Instead, we use a program called a *package manager* which can automatically download, install, and update programs. We'll be using a manager called **`apt`**. `apt` can install many things, including tools to build (or compile), and debug your code. Our containers already come with these tools for your convenience.
To get practice using `apt`, we're going to install some fun (and useless) command line programs, but `apt` is generally the way to go for installing almost anything on your course container.
:::::success
**Task:** Install `fortune` and `cowsay`.
Within your container, use `apt` to install:
- `fortune` - _A program which outputs a random fortune when used._
- `cowsay` - _A program that generates ascii-art of a cow saying text._
You will need to use `sudo`, which runs commands with elevated privileges.
First, do:
```console
$ sudo apt update
```
This builds an up-to-date index of packages available to download.
Then, for each package, do:
```console
$ sudo apt install <PACKAGE>
```
<details><summary>Help</summary>
<br />
```console
$ sudo apt install fortune
$ sudo apt install cowsay
```
</details>
<details><summary>If you're having trouble...</summary>
<br />
If you cannot run `fortune` or `cowsay` after installing them, you may need to tell the terminal where to find these programs by adding their location to the "PATH". You can do this by running the following command:
```console
$ export PATH=$PATH:/usr/games
```
</details>
<br />
Now, try it out! you can type `fortune` into your terminal to see a prediction for your semester, and can use cowsay by typing `cowsay "<some string>"`.
```
cs300-user:~$ fortune
You will gain money by an illegal action.
cs300-user:~$ cowsay "What a strange fortune... At least I get some money!"
______________________________________
/ What a strange fortune... At least I \
\ get some money! /
--------------------------------------
\ ^__^
\ (oo)\_______
(__)\ )\/\
||----w |
|| ||
```
Of course, `apt` can also be used to install more serious programs, like `vim` or `emacs`.
<details><summary>Extra (optional) fun</summary>
`fortune` generates text, and `cowsay` can display text in a fun way. Is there any way to combine the two? Yes!
You'll learn about how this works under the hood later, but data can be moved from one process to another using something called a *pipe*. By putting the `|` pipe character between two commands, the output of the first will become the input of the second.
Try it out by running:
```
cs300-user:~$ fortune | cowsay
```
</details>
:::::
:::warning
**Custom packages and `./cs300-run-docker --clean`**
Running `./cs300-run-docker --clean` will remove any custom packages that you have installed. This is because `--clean` removes any existing cs300 containers on your system.
Fortunately, you should be able to re-install your packages with `apt` using your new-found package installation skills!
If you have custom configurations for your packages, (e.g., a `.vimrc` file for `vim`), the configurations are persisted even if you have used `--clean`. This is because user-specific configurations are stored in `~` (or its sub-directories), which are just a mount of your `[YOUR_DIRECTORY]/home` directory on your machine.
:::
# Setting up Git
**Git** is an awesome version control tool for your code. In essence, it allows you to continuously save your project as a sequence of small changes instead of one final thing. Some of the cool things this grants you are:
- **Reverting changes** in case your code breaks.
- **Merging changes with partners**, even if you're working on the same file.
- **Having multiple branches**, to test out implementations without ruining your code.
- **Retrieving stencil code and handing in solutions**, like you'll be doing throughout the semester!
## Learning Git
There are a ton of resources out there to learn about Git, so we won't try to recreate them. Instead, we'll link you to a few tutorials, and encourage you to find more on your own!
:::info
**How we use git in CS300**: For CS 300, we will always advise you to use git *inside* your course container--the next section will show you how to set this up.
:::
Before you start running Git commands, you'll need to configure your name and email in Git.
:::success
**Task:** Set your name and email in Git. The examples below assume that you're doing it inside the container, but you can also do this on your computer if you prefer:
>
```console!
cs300-user@9899143429a2:~$ git config --global user.name "Jennifer Stevenson"
cs300-user@9899143429a2:~$ git config --global user.email "jennifer_stevenson@brown.edu"
```
If you are not already signed up to GitHub with your `brown.edu` email address, add it to your profile so that GitHub knows to correctly attribute commits to your username.
:::
Now, take a look at some beginning Git tutorials.
::::success
**Task:**
Read **[the Harvard CS 61 Intro to Git](https://cs61.seas.harvard.edu/site/2024/git/)**.
<details><summary>More Resources</summary>
</br>
Feel free to check out other resources to learn more!
[**Git -- The Simple Guide**](https://rogerdudler.github.io/git-guide/) -- *quick and dirty guide*
[**Git Handbook**](https://guides.github.com/introduction/git-handbook/) -- *in-depth introduction*
</details>
::::
## <div id="auth">Authenticating with GitHub</div>
Now that you understand the basics of how Git works, you will need to set up your container with GitHub so that you can push to and pull from your GitHub repos.
:::warning
:eyes: **Heads up!**: In this guide, we will show you how to set up GitHub in your container using **SSH**, which is a popular protocol for securely connecting to services. **This may be slightly different from how you have used Git in other courses, but we find that SSH authentication is easier and more reliable once you set it up.**
Therefore, **even if you have used Git before, be sure to follow these instructions**, as they're probably different from what you're familiar with!
If you would prefer to continue using a different GitHub authentication method (like Personal Access Tokens), you are welcome to do so, but please know that our staff may be able to provide limited debugging help.
:::
::::::success
**Task:** Follow these instructions to set up SSH authentication with GitHub:
#### Generating your SSH key
The first step is to create an *SSH key* that GitHub will use to identify you. To do this:
1. In your course container, run the following command:
```bash
cs300-user@9899143429a2:~$ ssh-keygen -t ed25519
```
2. When you run the command, you will prompted to provide some information, which you can fill out as follows:
- **When asked where to save the key, just press `Enter`** to save to the default location (`home/cs300-user/.ssh/id_ed25519`)
- **When asked for a passphrase, just press `Enter` to continue with no passphrase**. You can add one if you wish, you but you'll need to type it every time you push to git (which is a lot).
3. Next, you can check that the key was successfully generated by running:
```
cs300-user@9899143429a2:~$ ls ~/.ssh
```
If you see an output like `id_ed25519 id_ed25519.pub`, then you have successfully generated your SSH key! Follow the next set of steps for instructions on how to upload it to GitHub.
::::info
<details>
<summary>
<img src="https://csci0300.github.io/assign/labs/assets/windows.png"> <b>Extra steps for Windows only</b></summary>
Due to some oddities with how your home folder works on Windows, you might need change some more settings to finish setting up your key file. To check if this is necessary, run the following:
```
cs300-user@9899143429a2:~$ ls -la ~/.ssh/id_ed25519
```
The result should look like this:
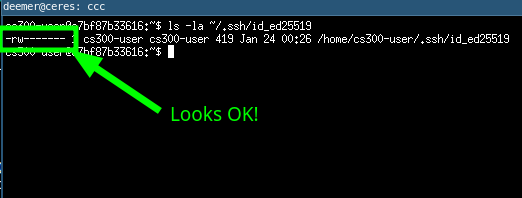
In your terminal output, check the first characters of the command (as shown in the figure above). If the first few characters are `-rw-------`, your key file's permissions are set correctly, and you're good to go!
If the first line looks different (eg. `-rwxrwxrwx` or `rwxr--r--`), you will need to adjust some WSL settings so the proper permissions can be applied. To do this, expand the box below:
<details> <summary>Expand for instructions</summary>
You need to apply the fix in [this StackOverflow post](https://stackoverflow.com/a/50856772). To perform this fix, run the following command **in WSL** (not in your course container).
```bash!
$ echo -e "\n[automount]\noptions = \"metadata\"\n" | sudo tee -a /etc/wsl.conf
```
You will be prompted for a password. This is your **WSL Ubuntu password**, which you set when you installed Ubuntu in WSL. (Note: **you will not see your password as you type it**. This is normal.)
After running this command, check that it worked by running the following:
```bash!
$ sudo cat /etc/wsl.conf
```
If you see an output that ends with the following, then the fix worked.
```
[automount]
options = "metadata"
```
Once you have applied this fix, **restart your computer**. Then enter **your container** (not WSL) and run the following command:
```bash!
cs300-user@9899143429a2:~$ chmod 600 ~/.ssh/id_ed25519
```
Then ensure this worked by running the following command:
```bash!
cs300-user@9899143429a2:~$ ls -la ~/.ssh/id_ed25519
```
If the first characters of the output are `-rw-------`, then you're good to go. If they are `-rwxrwxrwx` or something else, then the fix didn't work. (In this case, please make an EdStem post.)
After you have done this, continue with the steps below.
</details>
</details>
::::
#### Uploading your SSH key
Now that you have generated your SSH key, we need to upload it to GitHub. To do this:
1. First, we need to get the contents of your public key, which is the part of the key you just created that we need to upload. To this, use the `cat` command to print the contents of the file, by running the following:
```bash!
cs300-user@9899143429a2:~$ cat ~/.ssh/id_ed25519.pub
```
You should see output that looks something like the image below (the middle part should have a bunch of random characters, which are blurred-out in the image--this is your key!):

2. Select **the entire line of output** (as shown above) and copy it. To copy selected text from the terminal, use `Ctrl+Shift+C` on Windows or Linux, or `Cmd+C` on MacOS).
3. In your browser, open up your GitHub account settings and then select **SSH and GPG keys**--you should see a page like the figure below. At the top-right of the page, select **New SSH Key**.

4. On the next page, enter the following info, which should look like the figure below:
- **Title**: Give you key a name (e.g., `cs300`)
- **Key type**: Set to **"Authentication Key"**
- **Key** In the box, **paste in the line up copied from step 1** (`ssh-ed25519 <random characters> ...`)
- Then, click **Add SSH key** to add your key!

1. Finally, you should test your key to make sure it worked. In a terminal inside your container (eg. with a prompt starting with `cs300-user@...`), run the following command:
```bash!
cs300-user@9899143429a2:~$ ssh -T git@github.com
```
If you set a passphrase on your key, you will need to type it now.
If you see an output like this, enter `yes` to continue:
```
The authenticity of host 'github.com (140.82.112.4)' can't be established.
ED25519 key fingerprint is SHA256:+DiY3wvvV6TuJJhbpZisF/zLDA0zPMSvHdkr4UvCOqU.
This key is not known by any other names
Are you sure you want to continue connecting (yes/no/[fingerprint])?
```
If you see an output like this, you're good to go! :tada:

If you receive an error, make sure that you are running this command inside your container terminal, and that you also created the key inside your container terminal as well. If you continue to encounter issues, please post on Edstem or come to hours and we can help!
At this point, you have now connected your container to GitHub, and you can now get started cloning assignment code! See the next section for instructions on how to do this.
::::::
## GitHub Classroom Setup
:::warning
:warning: **Even if you have used GitHub Classroom before, please follow these instructions carefully** and **do not skip steps**. Our GitHub Classroom setup is a bit different than what you may have experienced in other courses, and we have some important guidance on how to avoid issues that may come up later in the semester.
Also, as an FYI: our stencil setup process in Lab 0 is also a bit longer than you may have seen in other courses, but **you only need to do it once**. After Lab 0, it will be very quick to load code for new projects and labs, saving your time overall!
:::
We use **GitHub Classroom** to distribute the assignments throughout the semester. You will be working with two repositories throughout the semester: one for all of your projects, and one for all labs. Each repo will contain a directory for each project or lab.
In the next step, you will set up both your labs and projects repos, and then push some code to our grading server. You'll also get some more practice using more terminal commands, which is a good skill to work on!
### Setting up your labs repo
:::success
**Task:** To set up your labs repo, do the following:
1. Create a repository for your labs by accepting **[this GitHub classroom link](https://classroom.github.com/a/s_tJZE4t)**. Follow the prompts to accept your assignment and open your GitHub page. ==At this point, **your repository will be blank. This is normal.**== Do not try to clone the repo yet, and continue reading. We'll add some code in the next few steps!
2. Open a terminal inside your container. If you had this terminal open from earlier, run the command `cd ~` to switch to your container's home directory, which is a good spot to place your repo. Your terminal prompt should now look something like this:
```bash
cs300-user@e7bf87b33616:~$
```
3. Next, create a directory (i.e., a folder) to hold your labs using `mkdir` and enter it with `cd`:
```bash
cs300-user@e7bf87b33616:~$ mkdir labs
cs300-user@e7bf87b33616:~$ cd labs
cs300-user@e7bf87b33616:~/labs$ # Prompt should now look like this!
```
4. Next, set up this folder as a git repository using the following two commands:
```bash
# Make sure you are in the labs directory (`pwd` shows the current directory)
cs300-user@e7bf87b33616:~/labs$ pwd
/home/cs300-user/labs # <--- Make sure it looks like this
# Create your repository
cs300-user@e7bf87b33616:~/labs$ git init
Initialized empty Git repository in /home/cs300-user/labs/.git/
cs300-user@e7bf87b33616:~/labs$ git branch -M main
```
<!-- > -->
5. Now, we need to add in the stencil code. To do this, we need to add a *remote* to the repository, which is Git terminology for a place where code is stored online (like a GitHub repo). Run the following two commands to add a remote called "`handout`" with the URL of our labs stencil code, like this:
```
cs300-user@e7bf87b33616:~/labs$ git remote add handout git@github.com:csci0300/cs300-s26-labs.git
cs300-user@e7bf87b33616:~/labs$ git pull handout main
```
If all goes well, you should see Git downlaod the code, and you should be able to see the stencil code in your repo with `ls`:

You have now loaded the lab code in your container, yay!
6. Remember how your GitHub Classroom repo was blank? Now we need to push the lab code to it! To get started, open up the GitHub page for your labs repo, which should look like the figure below. This page contains the remote URL for your personal repo. To find it, do the following:
- In the blue box, set the link type to **SSH** (if not set already)
- Click the **Copy** button

7. Go back to your container terminal (which should be in your `labs` folder). To connect your new `labs` repo with the one on GitHub, we'll add another remote called "`origin`". `origin` is the default remote name in git, and it's the one you'll be interacting with most frequently. To set this up, and push your code to your personal repo, run the following, and paste in the URL you copied from the previous step:
```
cs300-user@e7bf87b33616:~/labs$ git remote add origin <paste the URL you copied>
cs300-user@e7bf87b33616:~/labs$ git push origin main
```
If all went well, you should see output like this:

8. One final step, so you can see the whole process: **refresh your GitHub page**. You should now see the code you just pushed, like the figure below. Later in the lab, you'll make more changes, and you can view them here as well!

Phew! You've now successfully set up your labs stencil repo, which you'll be able to use for all labs in the course. :sunglasses: :tada:
Right now, the `handout` remote only contained code for lab 0, but we'll add more code as labs are released! At the start of each lab, we'll provide instructions on how to pull the new code.
:::
::::success
**Task:** Now that your labs repo has been set up, set up your **projects** repo using the same process. You can do this by following the same steps in the previous task, except for the following:
- In **Step 1**, create a new projects repo using this **[this GitHub Classroom link](https://classroom.github.com/a/Gp8qQgK0)**
- In **Step 3**, make a different directory to hold your projects (eg. `mkdir projects`)
- In **Step 5**, run the following commands to set up your "`handout` remote", instead of the ones listed:
```
cs300-user@e7bf87b33616:~/projects$ git remote add handout git@github.com:csci0300/cs300-s26-projects.git
cs300-user@e7bf87b33616:~/projects$ git pull handout main
```
... or, if you prefer, **here's a quick and complete set of instructions you can use**:
<details> <summary><b>Click to view</b></summary>
Here's the quick version. To make sure everything worked, compare your results to the screenshots in the labs version:
1. Accept **[this GitHub Classroom link](https://classroom.github.com/a/Gp8qQgK0)**, but don't clone the repo yet
2. Go to your container's home directory: `cd ~`
3. Make a new directory for your projects and enter it with `cd`:
```bash
cs300-user@e7bf87b33616:~$ mkdir projects
cs300-user@e7bf87b33616:~$ cd projects
cs300-user@e7bf87b33616:~/projects$ # Prompt should now look like this!
```
4. Initialize your git repository:
```bash
# Check your current directory
cs300-user@e7bf87b33616:~/projects$ pwd
/home/cs300-user/projects # <---- Make sure it looks like this
# Create your repo
cs300-user@e7bf87b33616:~/projects$ git init
cs300-user@e7bf87b33616:~/projects$ git branch -M main
```
<!-- > -->
4. Add a remote for "`handout`" and pull in the stencil code:
```bash
cs300-user@e7bf87b33616:~/projects$ git remote add handout git@github.com:csci0300/cs300-s26-projects.git
cs300-user@e7bf87b33616:~/projects$ git pull handout main
# Output should look similar to last time
```
5. Go to your (blank) projects repo on GitHub and copy the **SSH** URL in the blue box. Be sure the link is an SSH-type link (ie, starts with `git@github.com`).
6. Add a remote "`origin`" with the URL you just copied, and push your code:
```bash
cs300-user@e7bf87b33616:~/projects$ git remote add origin <paste URL you copied>
cs300-user@e7bf87b33616:~/projects$ git push origin main
# Output should look similar to last time
```
7. Check to make sure the project code appears on your GitHub page
Your projects repo should now be all set up, yay!
</details>
::::
## Exercise
At this point, you have your version control set up. Let's do a quick exercise to practice your newfound Git skills. The results of this part of the lab are what you hand in at the end.
Inside the `lab0` directory in your cloned labs repo, you should see a file `hello_world.c`. This is a [**Hello World**](https://en.wikipedia.org/wiki/%22Hello,_World!%22_program) program, and is the one you'll make changes to. To run the program you need to compile it first (_we will cover compilation in detail in a later lab_). For now, just use the following commands:
```shell
$ gcc hello_world.c -o hello_world # to compile it
$ ./hello_world # to run it
```
**==Note:==** Make sure you do everything inside of your container.
::::success
**Task:**
1. Modify the program so it prints the following tounge twister:
_Oh, Shelley? She sells seashells by the [shilling](https://en.wikipedia.org/wiki/Shilling). Silly, selling Shelley._
2. Then, commit and push your changes.
>
<details><summary>Help</summary>
>
Committing and pushing:
```shell
$ git add hello_world.c
$ git commit -m "Added tongue twister."
$ git push origin main
```
</details>
::::
You have now committed your changes to Git and they are stored in the version history (`git log` should show your new commit!). You've also pushed the new commit to GitHub's servers. Next, you'll set up the grading server and hand in this lab.
# Handin Instructions
Head over to the **[grading server](https://cs300.cs.brown.edu/grade/s26)**. If you were registered for CS 300 on the first day of classes, you should have received credentials by email. If you don't seen an email, please check your spam folder.
:::danger
If you only recently registered or you're shopping the course but haven't registered, you won't have an account yet. In that case, please complete [**this form**](https://forms.gle/72QyeYsJwHmWmNfw7) and wait until you receive your credentials. **We will create accounts based on the form entries around 8-9pm every day.**
:::
**Step 1:** Log into the grading server with the password you received. Once you're logged in, enter your GitHub username (at the top).
**Step 2:** Add the repository URL under the "Labs" category. Click "Labs" to initiate a fetch of your repository from GitHub.
<center><a href="https://csci0300.github.io/assign/labs/assets/lab-handin1.png"><img src="https://csci0300.github.io/assign/labs/assets/lab-handin1-small.png" style="border: 1px solid black;" /></a></center>
</br>
**==Note:==** If your GitHub account is not linked to your Brown email address, the grading server will give you a command to run to verify your repository.
**Step 3:** You should see your commit listed on the Labs page, as shown above. You'll also see a button labeled **"Lab 0 checkoff"**. Click this button to have your lab submission checked off and graded.
After your work passes the test, you should see a screen similar to this one, with a grade of 2 points for Lab 0 (you might need to refresh the page to see it):
<center><a href="https://csci0300.github.io/assign/labs/assets/lab-handin2.png"><img src="https://csci0300.github.io/assign/labs/assets/lab-handin2-small.png" style="border: 1px solid black;" /></a></center>
<br />
**Step 4:** Use your anonymous ID located at the top right corner of the grading server to fill out this quick **[Diversity Survey](https://forms.gle/wZ2ZnyghuWa5QjN16)**.
>
* Each question within the form is optional, and we will **never** tie this information back to your actual identity.
* We will only use this form to assess how diverse our student body is, and to check and correct for any bias in grading.
* We will delete your responses at the end of CS 300.
**Step 5:** If you have not already signed up for section, **go do so now!** Here's how it works:
- If you are an undergraduate student (CSCI 0300), please go to [CAB](https://cab.brown.edu) and enroll in one of the sections (C01-C08).
- If you are a graduate student [look here](https://csci0300.github.io/sections/#remote) for instructions on how to sign up for a section
Some more general information on sections:
* Sections will take place every week. They aim to give you an opportunity to interact with the course content, other students, and TAs in a smaller, more personalized setting.
* Sections will consist of approximately 25 students and are led by either two TAs or one of the instructors. Students and their instructor will have the same section throughout the semester.
* Sections will take place during section weeks (see the [course calendar](https://csci0300.github.io/schedule.html)) and run from Thursday to Wednesday.
* There will be eight sections throughout the semester and your attendance at section is **mandatory**. Section instructors will take attendance during section.
:::danger
Filling out both the diversity survey and registering for section is **required** and your grade for Lab 0 and Lab 1 will depend on whether you filled this out (even if you passed the checkoff on the grading server!).
:::
---
#### Congratulations, you've completed Lab 0 and are set up for CS 300! :tada:
# Appendix
This section contains extra instructions for special cases when setting up the development environment. You can ignore it unless you've specifically been referred to this section.
## Cloning your repositories on a new system
If you have already set up your GitHub repositories once but need to clone them again (e.g., you switched to a different computer mid-semester), you can use a shorter setup process to clone your repositories:
1. If you haven't done so already, follow this lab from the beginning until you get to [GitHub Classroom Setup](#GitHub-Classroom-Setup).
2. From a terminal in your container environment, clone your repositories with `git clone`, using the SSH link from your GitHub repository page for each one (see [here](#Setting-up-your-labs-repo) for how to find it):
```
# Clone your projects repo
$ git clone <your projects URL from GitHub> projects
# Clone your labs repo
$ git clone <your projects URL from GitHub> labs
```
If you get an error clone your repository, make sure you are using the **SSH** URls for your repositories (should start with `git@github.com`) and that you have (set up your SSH key)[#Generating-your-SSH-key]. If you eun into issues, please feel free to contact the course staff.
## Filesystem Performance on Macs
:::info
**Note**: This fix relies on the **VirtioFS** file sharing mechanism in Docker/MacOS. To use it, you might need to update to the latest version of Docker, and possibly update your MacOS version.
:::
We've noticed issues where Mac users have very slow filesystem performance inside the container--especially in the home directory, which is shared with your host system. Docker has several methods of filesystem sharing--we've seen improved performance by switching to the **VirtioFS** method. To do this:
1. Open the Docker app and enter the settings menu using the gear icon, which looks like this:

2. Under the "Choose file sharing implementation" select the **VirtioFS** method:

3. Click **Apply & Restart**. (If you have any containers running while changing these settings, you might need to stop them or restart your computer for the changes to take effect.)
5. Close the window and open the settings menu again. Make sure the box is still unchecked. If it isn't, restart your computer and try again.
If issues persist, please post on Edstem or come to hours! (You can continue using the container for now, though.)
## Configuring a WSL user
:::warning
**Important note**: This section describes a method for fixing your WSL configuration if your WSL starts up as the `root` user instead of your personal user. These instructions are new as of Spring 2025 in response to some new issues with WSL that have presented for some students this semester.
If you encounter issues with these instructions, you aren't sure how to proceed, or they don't seem to make sense for your system, please feel free to pause and ask us on EdStem or in hours! These instructions are new, and we may not have seen all possible ways the problem can occur, so it's possible your situation requires a different resolution. Please don't hesitate to ask if you're unsure!
:::
On some Windows versions, we have noticed that WSL may not be configured with the proper user permissions when you first set it up. If this happens, you can follow these instructions to help check your WSL installation and set up a default user.
### Checking your WSL installation
To see if you need to configure a WSL user, please do the following:
1. In a standard Windows terminal (Command Prompt or Powershell), run the command `wsl -l -v`, which should produce output like this:
```
C:\Users\you> wsl -l -v
NAME STATE VERSION
* Ubuntu Running 2
[ ... possibly more items after this ... ]
```
You should see at least one of line of output with the name `Ubuntu` marked with a star at the left:
- If you do not have an entry `Ubuntu`, run the command `wsl --install Ubuntu` and try again
- If you have an Ubuntu entry but there is no `*` next to it on the left, run the command `wsl --setdefault Ubuntu`
2. To continue testing, run the command `wsl`. Once WSL loads, your terminal prompt should change color and look something like this:
```
C:\Users\you> wsl
you@system:~$
```
3. Take a look at the terminal prompt (eg. the `you@system`) part:
- **If the prompt starts with your username (eg. your Windows username, or some other username that you configured)**, your WSL user is configured correctly! You should be able to continue the rest of the guide as normal! If you are setting up your WSL installation for the first time, you should continue from [here](#Set-up-CS-300-Docker-Environment).
- **If the prompt starts with `root` or ends with a `#` sign**, your WSL user needs to be configured. Follow the instructions below to configure your user
### Configuring your WSL user
If your WSL installation is logged-in as the root user, you will need to configure a user before you can continue setting up your container. To do this:
1. If you have not done so already, open a WSL terminal using the `wsl` command. The terminal should be running as the `root` user.
2. Pick a username you want to use for your user--it can be anything you want, but must use all lower-case letters (eg. `youruser`)
3. To create your user, run the following commands (replace `youruser` with your chosen username):
```
root@wsl-system:~# useradd -m -s /bin/bash youruser
root@wsl-system:~# usermod -a -G sudo,docker youruser
```
These commands create your user and give it permissions to use WSL and Docker. If this step was successful, you should not see any output printed in your terminal.
4. Before continuing, you will need to set a password for your user. To do this, run the following command (replacing `youruser` with your chosen username) and type/retype your password when prompted (Note: **you will not see your password when you type it**. This is normal.):
```
root@wsl-system:~# passwd youruser
Enter your password:
Re-type your password:
```
If you do not see any errors, your password was set successfully. If you encountered a problem and your password could not be set, simply try again.
5. Now that your user has been set up, we need to configure WSL to use it. To do this, run the following command (substituting `youruser` for your chosen username):
```
root@wsl-system:~# echo -e "\n[user]\ndefault=youruser\n" | tee -a /etc/wsl.conf
```
This commands adds some text to the end of the file `/etc/wsl.conf`. To check that this worked successfully we can use the command `cat` to look at the file, like this:
```
root@wsl-system:~# cat /etc/wsl.conf
```
If you see output that ends with the following, the file was edited successfully (where your chosen username should appear instead of `youruser`):
```
[user]
default=youruser
```
6. Now that your WSL installation has been set up, we need to test it. To do this, exit your WSL installation by running the `exit` command. You should see your terminal prompt change back to a Windows command prompt, like this:
```
root@wsl-system:~# exit
C:\Users\you>
```
7. If you attempted to open VSCode in your container previously, close VSCode now. This will ensure that it restarts properly after we finish fixing WSL.
8. Next, we need to restart WSL so it will restart with the new user. In your Windows command prompt (which should start with `C:` or similar), run the following command:
```
C:\Users\you> wsl --terminate Ubuntu
```
This command will close any other WSL terminals you have open. **If you receive an error message from Docker about WSL being disconnected**, click **Restart**: this should restart and reconnect Docker to WSL.
9. Finally, to test your installation, re-enter WSL using `wsl`. You should now see your terminal switch to a blue-green prompt that includes your chosen username, like this:

If your WSL prompt shows `root` instead of your user, please check the following:
- Make sure your `wsl.conf` uses the correct username from step 5
- Make sure you restarted WSL with `wsl --terminate`. You can also try restarting your computer
- If your WSL user remains `root` after this, please follow up with us on EdStem and we can debug further.
10. One final step: we need to make sure that Docker works properly inside WSL. To do this, run the following command:
```
youruser@wsl-system:~$ docker info
```
You should see a bunch of version information about your Docker setup. If you see some warnings/errors about `blkio`, this is safe to ignore. However, if you see an error like:
```
ERROR: Cannot connect to the Docker daemon at unix:///var/run/docker.sock ...
```
this means that Docker has not yet configured itself properly inside WSL. To fix this:
- Open your Docker Desktop app and go to Settings (top right corner), then > **Resources** > **WSL Integration** and then enable the integration for Ubuntu (if it is not enabled already), then try again.
- If issue persists, try restarting your computer, and then ask the course staff on EdStem.
Phew! Now that your WSL user has been configured and you have confirmed that Docker is connected, you're ready to proceed with the rest of the lab! If you are just starting the lab, you should be able to resume from [here](#Set-up-CS-300-Docker-Environment). If you encounter issues, please feel free to follow up with us in hours or on EdStem.
## Using department machines
If you are interested in using the container environment on department systems, you will need to follow a slightly different set up process to configure your development environment. On department systems, our container environment uses a different tool instead of Docker called **Podman**, which is better designed for systems with many users, like on department systems. Most of the time, you won't need to worry about this, but you'll need to follow a slightly different procedure to set up your environment now.
Please read the following instructions and keep them in mind as you do the rest of the lab 0 setup:
1. Before setting up Docker, visit [this page](https://cs.brown.edu/about/system/managed/containers/) and follow the instructions in the **"Opt-In"** section or instructions on how to enable support on your account. Then, you should be able to log into a department system and follow the instructions in this guide.
2. In the section **"[Set up CS300 Docker Environment](#Set-up-CS-300-Docker-Environment)"**, please run the following command instead of `./cs300-run-docker setup`:
```
$ ./cs300-run-docker build-image
```
This command compiles a special container image designed to run on department machines, which may take 15-20 minutes. After it completes, you can proceed with the rest of the setup.
3. In general, you may notice that `./cs300-run-docker` may take 1-2 minutes each time you run it--this is expected, as department systems need to do extra work when you run this command