<style>
summary {
//font-weight: bolder;
}
summary:hover {
text-decoration: underline;
}
h3{border-bottom: 2px solid black;}
section {
margin-bottom: 2rem;
padding: 0em 1em;
padding-bottom: 1em;
border-radius: 4px;
background-color: #f7f7f7;
border: 1px solid #ccc;
}
blockquote {
font-size: 16px;
}
.todo {
color: #ff00ff;
border: 2px dashed #ff00ff;
padding: 0em 1em;
border-radius: 5px;
margin-top: 1em;
margin-bottom: 1em;
/*display: none; // UNCOMMENT TO HIDE TODOs*/
}
</style>
**[« Back to the main CS 300 website](https://csci0300.github.io)**
# Project 3: Caching I/O
**Key deadlines**
- **Design discussion**: due during your section next week (March 5-7) (More info [here](#Step-1-Plan-your-design))
- **Final deadline**: Friday, March 13 at 8:00 PM
# Introduction
Caching is the concept of using a small/fast/expensive data store (often called a cache) in front of a large/slow/cheap one to improve performance. When data is requested, the system first checks the cache; if the data is found there, it can be retrieved much more quickly than if it had to be fetched from the slower data store.
Indeed, caching is at the heart of many optimizations in computing. Examples include:
1. The general storage hierarchy of a computer (hard drive → SSD → DRAM → L3-L1 cache → registers), as we've started seeing in lectures so far
2. Memoization (i.e., saving results of expensive computations for future reuse)
3. Your web browser's cache, which prevents redundant network requests when you access pages you've recently visited
4. Content Delivery Networks (CDNs), a technology that prevents long-distance Internet traversals by instead keeping copies of web pages close to users (this is the idea behind Akamai and Cloudflare, two billion-dollar companies!)
**In this assignment, you will be speeding up another performance-critical aspect of systems programming: the reading and writing of data to and from a filesystem.** This is also referred to as file input/output (I/O). To do this, you will use ✨ **caching** ✨. The file I/O cache you will implement in this project is similar to the CPU cache we already touched upon when we discussed alignment, with some differences. Notably, the file I/O cache is defined in software, rather than provided by hardware (as CPU caches are). This allows the I/O cache to have variable size. Additionally, your file I/O cache will have a single fixed-size slot (storing one contiguous segment of the file) rather than multiple slots.
## Motivation
Due to the design of Hard Disk Drives (HDDs, "disks"), interacting with data on disk involves waiting on several **slow** physical mechanisms. For example, magnetic hard disks require requests to wait for platters to spin and the metal arms to move to the right place where it can read the data off the disk. Even with modern SSDs, I/O operations on them take much longer than operations on memory. Moreover, I/O requires making **system calls** to the operating system, which are much slower than normal function calls (for reasons we will discuss soon).
If our programs were required to read and write their data solely from disk, they would be unacceptably slow. We saw an example of this in the form of the `diskio-slow` program in lecture.
Fortunately, we can do better using **caching**! If we are willing to sacrifice a small amount of data integrity (i.e., in the event that your computer suddenly loses power, some data is lost), we can gain 100--1,000x in performance. To do this, the computer temporarily holds the data you are using inside of its main memory (DRAM) instead of working directly with the disk. In other words, the main memory (DRAM) acts as a **cache** for the disk.
# Overview: what you will build
You will implement an Input/Output (I/O) library that supports operations such as:
- Reading data from files (`io300_readc` and `io300_read`),
- Writing data to files (`io300_writec` and `io300_write`), and
- Moving to a different offset within the file (`io300_seek`)
Together, these functions make up a common interface (e.g., an API, or Application Programming Interface) for how to work with files. Your library will behave much like the low-level system calls that perform these operations, except that your implementation will use a **cache** to speed up access to data and reduce the number of disk operations required.
<details><summary>What's an API?</summary>
**API (Application Programming Interface)** -- This is a formal contract that a piece of software uses to declare to the outside world how it can be used. An example of this would be the `List` interface in Java which states that anything claiming to be a `List` can be asked to `add()`, `remove()`, `insert()`, ..., and other "list-like" things. In this project, we have defined an API for an `io300_file` `struct` representing a file, providing methods for reading, writing, and seeking on the file/`struct` that you will implement.
</details>
<br />
The key design aspect in this project is figuring out how to interact with the cache and when to make system calls to interact with the file on disk--for example, you'll need to figure out things like:
- When should your functions read data from the file vs. the cache?
- What metadata do you need to store in order to keep track of which data is cached?
- When should your functions write (or flush) any changes to made to disk?
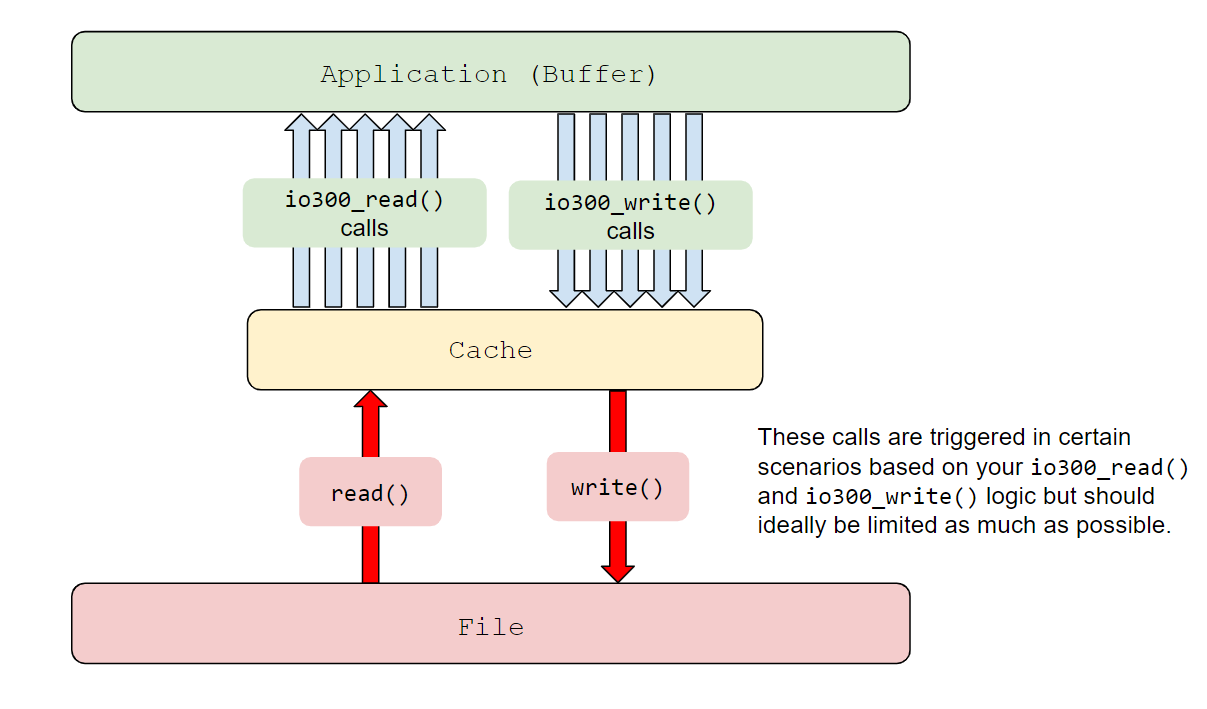
Overall, your implementation for these API functions will make up an intermediate "caching layer" to minimize expensive trips to the file on disk, as shown in the figure below. For example, if the user calls `io300_read` to read some bytes from the file and they are present in the cache, you can return the data immediately without needing to read from disk. Otherwise, your implementation will need to load those bytes from file into the cache (perhaps also making them available for future calls as well!).
This may sound like a lot at first--but don't worry! We provide a lot of resources to help you come up with a plan and get started. Keep reading, you got this! :smile:
### API overview
Our core functions for working with files will define an API (Application Programming Interface), which is like a contract for how a piece of software can be used: in this case, our API describes how users will interact with your I/O library to read and write from a file using your caching implementation. Here's an overview of the key functions:
:::warning
:eyes: **Heads up!** Don't start implementing these functions yet! The remainder of the handout describes more on the specification for how these functions to work, and how to think about your design as you get started. Keep reading for more details!
:::
#### Reading files
- **`io300_read`**: When an application wants to read from a file, it can call your `io300_read` instead of the system call `read`. The arguments to `io300_read` are:
```c
size_t io300_read(struct io300_file* const f, char* const buff, size_t const sz)
```
where:
- `f` is a struct with info about the file to read from
- `sz` is the number of bytes to read
- `buff` is the **application buffer**: a region of memory where the read bytes should go
In other words, `io300_read` should write bytes from the data stored in a file (or the cache) into `buff`. That way, when the `io300_read` call finishes, the caller can read the bytes stored in `buff`.
- **`io300_readc`**: Oftentimes we wish to only read a _single_ byte at a time from a file, so your library should also support `io300_readc`, which has arguments:
```c
int io300_readc(struct io300_file* const f)
```
#### Writing files
- **`io300_write`**: The `io300_write` function has a similar structure to `io300_read`:
```c
size_t io300_write(struct io300_file* const f, const char* buff, size_t const sz)
```
In this case, the caller puts the bytes they want to write into the application buffer `buff`. They then call `io300_write` on `buff`, which writes the first `sz` bytes of `buff` to the file `f`.
- **`io300_writec`**: Similar to `io300_readc`, `io300_writec` writes a single character to a file:
```c
// Write one character to file
int io300_writec(struct io300_file* f, int ch)
```
#### Seeking within files
- **`io300_seek`**: Often, an application may want to skip to a specific byte in a file--this is called "seeking". When seeking, the user provides an *offset* (`pos`, an integer), which sets the new position in the file for future reads:
```c
int io300_seek(struct io300_file* f, off_t pos);
```
:::danger
**Note:** Your `io300_read` implementation should **not** just repeatedly call `io300_readc`, and your `io300_write` implementation should **not** just repeatedly call `io300_writec`. If you implement `read` and `write` by calling `readc`/`writec`, respectively, you will not pass the performance tests.
:::
#### Non-API functions (i.e., private helper functions)
In addition to these core functions, our stencil files also contain some starter versions of helper functions that we suggest using to implement your core API. You're free to use these, or make your own, but please keep these in mind and think about how they can help you as you work on your design.
# Roadmap: how to get started
Since this is a design-focused project, we've provided some resources to help guide you in planning and building your design and iterating on it as you work on your implementation. As you get started, you should do the following:
1. **Read the rest of the handout** to set up your stencil and get acquainted with the tools (Step 0). For the later sections, we recommend skimming over them just to understand what resources are available, so you know to look for them later.
2. **Work on your design plan** as outlined in the Step 1.
3. In the first week of the project, you will **bring your design plan to section** to get it checked off by a TA and discuss it in section with your peers, which should provide some useful feedback
4. ***After* creating your design plan, begin your implementation!** We recommend starting with `io300_readc` and `io300_writec`, and then moving onto `io300_read` and `io300_write`.
- ==**Note**==: You do not have to wait to start implementing until after your section, but we **strongly** recommend working on your design plan before you start writing code. Trust us---this *will* save you time, and make your life easier!
5. Make sure your implementation is both **correct** and **performs well**. We provide a lot of tests to help you do this:
- We include a suite of correctness tests (`make check`) that make sure that your implementation conforms to the API specified in `io300.h` and properly implements file I/O.
- As part of the correctness tests, we include a framework for you to **write a few your own tests** that are specific to your design and can help you find bugs. We'll describe the different kinds of tests and guide you through writing your own in the next few sections.
- In addition, your implementation will be evaluated on performance (`make perf`) to ensure you are taking advantage of caching: you must ensure that your implementation is at most **5-10x** slower than `stdio` (the standard library's caching I/O implementation) in all cases, as evaluated by the grading server. (Details below, and in the grading rubric.)
<!-- Your approach to implementing this project should be:
1. **Read the entire handout** as some critical information is located in later sections.
2. Attend a design discussion, where you will discuss a design for your cache data structure with a TA and with your peers. This includes the mechanics of how your cache works and all metadata required to maintain it.
4. Fill out the functions in `impl/student.c` to implement **caching file I/O** that conforms to the API specified in `io300.h`. In addition, you must ensure that `make check` reports that your implementation is correct, and `make perf` reports that your implementation is at most **5--10x** slower than `stdio` (the standard library's caching I/O functions) in all cases (see grading rubric).
-->
The next few sections describe each of these steps in more detail, and provide more resources on debugging and testing.
# Project Details
## Installation
To get started on the project, you will need to pull some additional stencil code into your project repo. You can do this as follows:
1. Open a terminal in your container environment and `cd` into the directory you set up as your project repo from Lab 0 (e.g., `cd projects`)
2. Run the following command to pull the latest code from the `handout` remote (see below if you get errors):
```
cs300-user@9899143429a2:~/projects$ git pull handout main
```
If this reports an error, run:
```bash
git remote add handout git@github.com:csci0300/cs300-s26-projects.git
```
followed by:
```bash
git pull
git pull handout main
```
This will merge our Project 3 (`fileio`) stencil code with your repository.
:::warning
**Note: If you see a warning about "divergent branches"...**
<details> <summary><b>Expand for instructions</b> </summary>

This means you need to set your Git configuration to merge our code by default. To do so, run (within the same directory in your labs repository workspace):
```console
$ git config pull.rebase false
$ git pull handout main
```
</details>
:::
:::danger
**If your terminal window changes to something like this**:

<details> <summary><b>Expand for instructions</b> </summary>
Your terminal has asked you to add a commit message to explain what code was merged in, and opened a text editor so you can write the message. The top line is a default message, which you can use as-is. To use the message and finish the commit, do the following:
- **If your terminal looks like the image above**, press `Ctrl+s` to save, then `Ctrl+q` to quit. (These are shortcuts for the text editor `micro`, which is the program that is running now)
- **If your terminal instead has a bar at the top that says `GNU nano`**, you are using a text editor called `nano`. To save your commit and exit, press `Ctrl+x`, then press `y`, and then press `Enter`.
</details>
:::
Once you have a local working copy of the repository that is up to date with our stencils, you are good to proceed! You should now see a new directory called `fileio` inside your projects repo: you should do all your work for this project in this directory.
## Stencil and Layout
We provide you with the following files:
| File | Purpose |
| -------- | -------- |
| `io300.h` | A list of all the methods your implementation must supply to be used with the test programs. |
| `impl/` | Contains the C source for this project. `impl/student.c` is **the only** file you will need to edit. |
| `test_scripts/` | Test scripts provided by us that working implementations will pass. Run `make check` and `make perf` to use them. |
| `test_programs/` | Contains the test programs that use your implementation (run by `make check` and `make perf`) |
| `test_files/` | Some example files to run your implementation on while you are developing. |
In particular, `test_programs/*.c`, includes a number of existing test programs that do basic file manipulation. These programs are written in such a way that all interaction with the filesystem is done through via our Caching I/O API, as defined by `io300.h`. This is important for two reasons:
- These test programs are used by our correctness and performance tests, so be sure to take a look at them when debugging to understand what the tests are doing!
- Using a standard interface in `io300.h` means we can run the tests using different implementations that provide the same functions. This is a good software design practice, and it also lets us test your code against other *baseline* implementations that provide the same functionality (but very differently!)
We provided you with two "baseline" implementations, and you will write your own. In our stencil, each implementation has a name, as follows:
1. **`naive`**: The **naive implementation** (`impl/naive.c`) reads from and writes directly to the disk **without any caching**. The initial project stencil is identical to this implementation.
2. **`stdio`**: The **standard I/O implementation** (`impl/stdio.c`) leverages the existing C Standard Library's "buffered" I/O, which does some clever caching. Your implementation will need to have performance within 5-10x of `stdio` (more details later).
3. **`student`**: **Your implementation** (`impl/student.c`): This is your Caching I/O implementation! All of your code for this project will go in this file. The initial version of this code is identical to the `naive` implementation--your job is to replace it with your own version that uses caching!
In the next section, we'll demonstrate how you can get started running the tests and exploring the differences in the implementations, as a starting point for writing your own!
## Step 0: Getting acquainted with I/O and system calls
:::info
**Note**: Unlike DMalloc, this project is in C. This means you **cannot** use C++ language features and data structures in your solution.
:::
The core idea behind this project is the following:
**When a program asks the I/O library to write a byte to a file, instead of immediately going to the disk, put that byte in a cache, then write the entire cache to disk at a later point.**
To start getting acquainted with the stencil and what the I/O library means, we recommend doing the following:
1. **Open up `io300.h` and take a look at the function definitions and their comments.** These are headers for the "public" functions that define our I/O library, and describe a contract for how they should work. Your implementation and our baselines should all implement these same functions.
2. Even though the implementations provide the same functions, they have very different performance because they use I/O very differently! **To try this out, let's first build the `naive` implementation to see how it performs. To do this, run the following commands** (details in comments):
```shell
$ make perf_testdata # Generate a 1 MiB performance test file
$ make -B IMPL=naive # Build naive implementation
$ time ./byte_cat /tmp/perf_testdata /tmp/testout # Run test
real 0m18.515s # <---- Total runtime (may be differ on your system)
user 0m6.819s
sys 0m11.694s
```
The program `byte_cat` is one of our test programs: it behaves like the common shell program called `cat` (:cat:), which copies data from one file (here, `/tmp/testperfdata`) and writes it to another (`/tmp/testout`). The `time` program measures the execution time for the program: the `real` number is the actual time for the program to run (called "wall clock time"); `user` and `sys` measure details about where this time was spent, which we'll discuss later in the course.
*(**==Note==**: if the test takes >1min to run on your system, just kill it with `Ctrl+C`--the point is just to see that it's super slow!)* :turtle:
3. As we mentioned previously, the `naive` implementation does not use any caching. For an example of how much caching can help, let's build and run the `stdio` implementation, which uses the C standard library's default caching implementation (called "buffered I/O"). **To try the `stdio` implementation, run the following commands**:
```shell
$ make -B IMPL=stdio # Build with stdio implementation
$ time ./byte_cat /tmp/perf_testdata /tmp/testout
real 0m0.140s # <--- Should be ~100x faster!!!! :O
user 0m0.112s
sys 0m0.028s
```
**The `stdio` version should be much faster!!!!** The numbers will differ on your computer, but the general relationship (a ~100x difference!) will hold. This is the benefit of caching! :rocket:
For this project, your task is to fill in the third implementation (`student`, in `impl/student.c`) try to get as close to `stdio` as possible. Don't worry, though, we're here to help you make a plan!
#### Investigating performance
First, let's see *why* the `naive` implementation is slow. To see this, we can use a handy tool called **`strace`**. `strace` (short for **s**yscall **trace**)) shows the *system calls* made by your program as it runs. `strace` will be a useful debugging tool in this project--we hope it will become your friend!
**First, some background**: System calls (syscalls) are how your program interacts with the operating system: whenever your program needs to interact with anything outside of its own memory (e.g., disk I/O, using the network, fetching the time), it needs to make a syscall.
We'll talk more about how system calls work under the hood in the operating systems part of the course (and in the next project!)--for now, though you can think of system calls just like regular function calls, except that the work is performed in the operating system (OS) instead of in your program.
**However, syscalls are expensive, especially for I/O**: a syscall needs to switch into OS mode, do a lot of safety checks, and then finally talk to the disk hardware to read/write the data--which itself is very slow, compared to memory! For programs that do a lot of file operations (like our tests), system calls will be the bottleneck on performance---**the more syscalls the program needs to use files, the slower it will be!**
To start seeing this--and how we can improve--we can run `strace` on the `naive` implementation using one our test files. To do this:
1. **Compile** the `naive` implementation, as before:
```shell
$ make -B IMPL=naive
```
2. **Run** `strace` on the `byte_cat` test, like this:
```shell
$ strace -e trace=read ./byte_cat test_files/words.rot13.txt /tmp/out
````
This tells `strace` to print out information about all of the `read` system calls, which is every time the `naive` implementation asks the OS to read from disk:
```shell
$ strace -e trace=read ./byte_cat test_files/words.rot13.txt /tmp/out
read(3, "\177ELF\2\1\1\0\0\0\0\0\0\0\0\0\3\0>\0\1\0\0\0\260\v\2\0\0\0\0\0"..., 832) = 832
[...]
read(3, "1", 1) = 1 # These are the bytes of the file!
read(3, ".", 1) = 1
read(3, "1", 1) = 1
read(3, " ", 1) = 1
read(3, "V", 1) = 1
read(3, "a", 1) = 1
read(3, " ", 1) = 1
read(3, "g", 1) = 1
[...]
```
Let's break down what we're seeing:
- The initial lines relate to `read()` system calls that happen as the OS starts up your program (which is encoded in a format called "ELF"). You can ignore those lines.
- At some point, you'll see a lot of lines like `read(3, "V", 1) = 1`. These correspond to the operations on the file! Similar to the `io300_read` function that you will implement, the `read()` syscall attempts to read some number of bytes from a *file descriptor* (FD) into a buffer. A line like `read(3, "V", 1) = 1` shows the arguments and return values for the syscall: this line shows a call to `read` with arguments `3` (the FD number), `"V"` (contents of the buffer after read), and the size `1`, and that the return value was `1` (as indicated by `= 1`).
- What data is being read? To see this, take a look at the input file we used to run the program: `test_files/words.rot13.txt`. Try to match up the file contents with what you see in `strace`: each `read` call is returning one character of the file (the trace excerpt above is from line 1!)
**What does this mean?** This means that the program (when compiled with the `naive` version of the I/O library) is calling `read` once for each character in the file!
:::info
🤔 **Cook on this for a minute**: Can you see a reason why this is inefficient?
<br />
<details>
<summary><b>Give me some hints!</b></summary>
Let's consider a thought experiment, this time with the `write()` system call.
Imagine that I am writing a program that will sequentially write 1000 bytes (all of value `'c'`) to a file, one byte at a time.
One way to do it would be to call `write()` 1000 times, once per byte.
```c
for (int i = 0; i < 1000; i++) {
write(fd, 'c', 1);
}
```
Another option would be to create a local variable `char buff[40]` and put bytes into that. Once we have written 40 bytes to `buff`, we issue **one single** call to `write(fd, buff, 40)`.
```c
char buff[40];
for (int i = 0; i < 1000; i++) {
buff[i % 40] = 'c';
if (i % 40 == 39 || i == 999) // if buffer is full
write(fd, buff, 40);
}
```
The critical thing to remember is that a call to `write(fd, 'c', 1)` and `write(fd, buff, 40)` will take **nearly the exact same amount of time** because the cost of executing a system call is much larger than the difference between moving 1 byte and moving 40 bytes.
So with the second solution, we can reduce the number of syscalls by 40x.
In this project, you will be generalizing the second solution to deal with things like writing bytes backwards (decreasing indices) and writing chunks of bytes all at once.
</details>
:::
In this project, your goal will be to use a cache to reduce the number of system calls that need to be made in order to work with files. In the next section, we'll discuss some concrete steps for planning your design to do this.
:::warning
**A note on design**: This project deliberately leaves you a lot of design freedom. You should feel free to come up with clever caching designs and benchmark them.
Both simple and involved schemes will work, but cleverer schemes will get close to the performance of `stdio`, and may sometimes even beat it! We will award extra credit for impressive performance (see the grading rubric).
_You're welcome (and encouraged) to work with other students in groups to come up with your design. As usual, the code you hand in must be your own._
:::
## Step 1: Plan your design
This is a design-heavy assignment: **it's crucial that you think conceptually about how your caching I/O implementation will work *before* you write substantial amounts of code**.
Before you get too far, you'll want to have some answers for the following questions--the remainder of this section will provide an example (which we'll call the "design example") and some concrete steps for getting started on answering them. This will make up your *design plan* which will help guide your implementation.
**Design discussion**: We also find it's very helpful to discuss your design with others and get feedback, so **we are devoting Section week 5 (March 5--6) to discussing your design plans: you will bring some version of your plan to section this week**, where you will discuss it with your peers and talk about examples with our staff! We hope that this will provide a good point to check in after you've had some time to start on the project and help refine your ideas.
::::success
**Task**: **Follow the rest of the text in Step 1 to work on your design plan, which you'll need to bring to section.** There's no particular requirement for what your design plan should look like, so work on the parts below in whatever format you find works best. For details see **[What to bring to section](#What-to-bring-to-section)**.
<br />
:::danger
:warning: **Warning**: As we've said repeatedly, a key part of this project is about design: being able to reason about what your caching implementation *should* do in a given situation is going to be the best thing to help you debug later. **When things go wrong, you won't be able to just try random things until the tests pass**--instead, your best strategy is to check your code to make sure it's following your design (and also evaluate if your design makes sense). **This step is designed to help you build these skills!**
:::
::::
<section>
### Questions to think about
Not unlike DMalloc, the key to this project thinking about *metadata*: in addition to loading data to and from the cache, you'll need to keep track of metadata about what data is currently in the cache, where it goes in the file, and so on.
Concretely, some questions to consider as you work through the design example are (in any order):
<!-- 1. When read/write/readc/writec is called, what metadata do you need to keep track of where to next read/write data in **the cache**?
2. When the data needed isn't in the cache, what metadata is needed to know where to read/write the data in **the file**? -->
1. **What metadata is needed to keep track of where to next read/write data in (a) the cache and (b) the file?**
2. **What metadata is needed to keep track of what part of the file is currently in the cache?**
3. **When performing operations (read/write/readc/writec), when can you access the cache instead of the file?** Ideally, you would like to access data in the cache without going to the file, but this might not always be possible.
4. **When do you *fetch* data from the file into the cache? Conversely, when should you *flush* data from the cache to the file?**
5. **How is your cache laid out in memory?** For our project, the cache is just an array of bytes--but you get to decide (based on your answers to the other questions) how to use it. In other words, how does what goes in the cache relate to your metadata?
</section>
We don't expect you to be able to answer these questions immediately. Rather, the example below should help you formulate an initial plan, which you'll refine as you start implementing, and get feedback on during section!
<section>
### Design example
To help you build your design plan--which will involve building answers to the design questions above--we've prepared an example set of file operations that demonstrates how you can leverage the cache and think about your design.
To work on this, take a look at the example code below and imagine how it would operate under the following conditions:
- The cache has a size of just 8 bytes
- The test file is the small sample file `test_files/tiny.txt`, which you can find in your repository
Here's the program (concrete steps to approaching it below):
```c=
char buffer[5];
io300_file* f = io300_open("testfiles/tiny.txt", MODE_RW, "tiny!");
ssize_t r = io300_read(f, buffer, 5);
ssize_t w = io300_write(f, "aaa", 3);
r = io300_read(f, buffer, 2);
ssize_t s = io300_seek(f, 12);
w = io300_write(f, "aaa", 3);
r = io300_readc(f);
io300_close(f);
```
For each line of code (ie. every `io300_` call) in the example, we recommend filling out a **[template](https://docs.google.com/document/d/1LuBhYNJJD5fwDcUlhoKNe4wwmpCeEAPiEKlWsmsmvlE/edit?usp=sharing)** like the one below with a plan for how the cache and your metadata should change, and how the file changes--drawing pictures on paper is a great way to work on this part of the assignment!

We've prepared a :sparkles: **[worksheet version](https://docs.google.com/document/d/1xP85XOOt_u-FO2ycdqhnG3FZY9PJocv731NRHO3xzXc/edit?usp=sharing)** :sparkles: that you can copy, but feel free to use any format or template you like (paper, digital, etc.). At the end, though, you should end up with **eight (8)** pictures like the above with some notes on the state of the cache and metadata at each point.
:::info
<details><summary><b>Some things to think about as you work on each step</b></summary>
1. What would this line of code do with no caching? In the stencil version, each line would simply make the respective system call to perform this operation. (What would this ordinarily return? See the comments in `impl/student.c` and `io300.h` for details.)
2. Assuming you had a cache, how could you do better? Could you avoid making a system call and instead use the cache? What metadata would you need to tell you if this is (or isn't) possible?
3. When you *do* need to read from the file from disk, how could you read from the file such that some subsequent reads can use the cache instead? This is called *prefetching*!
- When should you first call `read()` to fill your cache?
4. Similar to (3), note you don't need to write to disk every time the user calls `io300_write`/`io300_writec`, so long as the changes do get written to disk at some point. How could you leverage the cache for this?
- How would you keep track of if the cache has been modified?
5. Remember to think about how the OS will track the current read/write position in the file (often called the read/write head), which is separate from your metadata. You can find more info on this [here](#Important-background-on-files-very-helpful), and we'll discuss it more in Lecture 11, and the design discussion will also cover this. Consider how your metadata to keep track of the current read/write position in your cache, and this might differ from the file position managed by the OS.
6. What happens if we seek to a location that is within the cache? How should this differ from seeking to a location outside of the cache?
</details>
:::
:::success
**Check your work**: To help you out as you're designing your cache, we'll share what your contents of your file, cache, and return value are after two select lines of code.
<details>
<summary><b> After Line 3 </b></summary>
- **File Contents**: "this is a test\n"
- **Cache Contents**: "this is "
- **Return**: 5
</details>
<details>
<summary><b> After Line 7 </b></summary>
- **File Contents**: "this aaaa test\n"
- **Cache Contents**: "a teaaa"
- **Return**: 3
</details>
:::
## What to bring to section
As you work on your design plan, you should take notes in some kind of document (paper, electronic, etc.) and bring it to section to show to a TA and your peers. There's no required format, but we'd like to see that you've worked on the example and made a plan for what to use for your metadata. In particular, we recommend bringing the following:
- Worked out examples for the [design example](#Design-example) (either by following the [worksheet](https://docs.google.com/document/d/1xP85XOOt_u-FO2ycdqhnG3FZY9PJocv731NRHO3xzXc/edit?usp=sharing), or some other format)
- Some notes with answers to the [questions to think about](#Questions-to-think-about) (informed by what you learned working through the example)
During section, you'll pair off with one or more students and discuss your design plan, and then we'll discuss some examples as a class, so this will be a great opportunity for you to get some feedback and refine your plan!
**To receive attendance credit for section, you must show us *something*.** Grading is on completion, but keep in mind that **this is a great opportunity to discuss your design and get feedback--so be sure to take advantage of it!**
If you get stuck while working on your plan, that's okay--bring what you have and some concrete questions, and we can discuss! **We also recommend coming to hours any time before your section, and we can help you get "unstuck" and continue working!**
</section>
## Step 2: Starting your implementation: testing as you go
Now it's time to get coding! To help begin your implementation, and help you get started with testing, we've prepared a framework of *unit tests* (also called *regression* tests) to help you build your implementation in small stages and help you check your work as you go. We've written the test framework and a couple of tests to get you started, and we ask that you write some more as you go.
We hope that writing some tests will help you test your own approach as you build it, reducing the time you need to spend debugging our other more complex tests. Therefore, time you spend writing tests could save you debugging headaches later!
Let's start by thinking about implementing `readc`. Before we use `readc` in a whole program (like the `byte_cat` program we ran earlier), it can help to test the behavior *just `readc` on its own* to make sure it works. To start this off, take a look at the file `test_programs/rtest001.c`, which is our first regression test:
```c
#include "unit_tests.h"
int main() {
test_init();
assert(CACHE_SIZE == 8);
// Create and open a test file containing the string "hello world"
struct io300_file* f = create_file_from_string(TEST_FILE, "hello world");
// Do some readc operations
char c1 = io300_readc(f);
char c2 = io300_readc(f);
char c3 = io300_readc(f);
// Make sure the results from readc are what we expect
assert(c1 == 'h');
assert(c2 == 'e');
assert(c3 == 'l');
// Close the file
io300_close(f);
// Make sure the input file wasn't modified
check_file_matches_string(TEST_FILE, "hello world");
return 0;
}
```
This tiny test program just makes some `readc` calls and checks that the output meets our expectations. We call it a "unit test" because it only tests a tiny subset of the I/O library we're building--in this case `readc`. You've seen this sort of thing before: in our previous projects all of our autograder tests have been unit tests. This is cool because we can now begin to test `readc` independently of all the other functions, which will make it easier to implement!
Let's run this unit test. To do this, run:
```
$ make check-regression
```
You should see this test (and several other unit tests) pass:

😮 **But wait, we haven't implemented anything yet!** Why did the test pass? Remember that our stencil implementation is already *correct*, in that it returns the correct outputs, but it's just not *fast*. You will need to replace the stencil implementation with one that uses the cache: as you work, this will inevitably cause the tests to fail at first--which is called a *regression*--but then you'll get it working again as you fix your implementation.
For this reason, another industry name for these tests is **regression** tests, because they can help you find specific places where things break in your code. In this project, you'll use regression tests to help you get started, and then help you check for bugs as you optimize.
:::success
**Task:** Now to get coding! Having seen how `readc` should operate, start implementing `readc`, focusing on passing `rtest001`.
- Your implementation doesn't need to be fully complete yet, but you should aim to pass this initial test--we'll make `readc` more robust in the next step.
- For help interpreting the test output, we recommend stepping through the test's `main` function in GDB. (See [Debugging](#Debugging) for more details.)
:::
Once you have `rtest001` passing--congrats! You officially have your first version of the `readc` function. However, `test001` doesn't cover everything we need for `readc`. To show you what we mean, and show you how to write tests on your own , let's write another test for readc. To do this:
::::success
**Task**: Let's create another test for `readc`:
1. Create a copy of `rtest001.c` named `rtest002.c`, which should be located in the same folder
2. Change the test to **read 10 bytes** instead of 3.
3. Run the regression tests again--the test may pass or fail, but either way you should see it in the test list:

:::info
4. 🤔 **Cook on this for a minute**: in terms of the cache, what's different about `rtest002`, compared to `rtest001`? Even if your version passed, why might `rtest002` fail when `rtest001` passes? (Hint: remember, the cache is **8 bytes**!)
<details> <summary>Read after you've thought about it</summary>
If the cache is size 8, what must happen after 8 bytes have already been read? At some point, it will be necessary to fetch new data into the cache. This tests makes sure that `readc` triggers a fetch at the appropriate point.
As you write more tests, you should be thinking about cases like this.
</details>
:::
::::
Tests like these demonstrate *boundary cases* where the behavior of your caching implementation will change. You should think about this as you write more tests!
:::success
**Task**: Now, we can use `rtest002` to help us make progress: if your `rtest002` failed, fix your implementation for `readc` to pass the test.
:::
**Take a moment to think about what we just did**: we wrote a regression test that involved a new behavior of our caching library (i.e., fetching the cache from `readc`), and used it to make sure our `readc` did this correctly. As you continue your implementation, we suggest using this strategy to help you make progress.
## Implementing Caching I/O
Now that you've seen how to get started by working with regression tests, it's time to get started on the rest of your implementation. We recommend following the same strategy as we discussed for `readc`: write a regression test for a behavior that uses the cache differently, and then extend your implementation to make it pass.
:::success
**Task:** Complete the functions in `impl/student.c` marked with `TODO` comments such that you implement **cached file IO**. We recommend implementing `readc` and `writec` first (stage 1), then consider cases where `readc` and `writec` use seek (stage 2) and then continuing on to `read` and `write` (stage 3), and, finally, by considering interactions between all of the functions. Here are some recommendations to keep in mind:
- **Test as you go**:
- As you start on each stage, we recommend writing a regression test with a small example of the behavior you expect to see based on the API, and based on your design. As part of your grade, we ask that you **write at least five (but no more than ten) regression tests**, similar to what we described for `readc` in the previous section. Make sure these test cover all five functions. See **[this section](#Writing-your-own-regression-tests)** for details on this requirement, and guidance on how to write tests.
- Once you have a good sense from the regression tests, you can continue checking your work with the end-to-end and fuzz tests, which are more comprehensive. See the **[Testing](#Testing)** and **[Debugging](#Debugging)** sections for more details on how to interact with these tests.
- **Don't panic**: Implementing this project may seem like a lot at first, but you got this! Remember your design plan, and try to work things out by stepping through small examples (either on paper, or in the debugger).
- **Commit your work often**: As you test and debug your design, you might want to roll back your code to a previous version. Remember that you can use git to help you here--commit your work often so that you can either check out an old version if needed, or just look at it on Github.
<br />
Overall, your final implementation should:
1. Conform to the API specified in `io300.h`.
2. Contain 5-10 new regression tests in the `test_programs` directory. See [here](#Writing-your-own-regression-tests) for more details.
3. Pass all correctness tests run by `make check`.
4. Perform no more than **5--10x** slower than stdio in all cases tested in `make perf` (more details [here](#Making-it-fast)).
As you get started, we **highly** recommend that you continue reading the rest of this section (which contains important background info), and then skim [Testing](#Testing) and [Debugging](#Debugging) sections, so you know what tools are available.
Good luck! You got this. 🚀
:::
:::danger
**Note:** you **cannot** use any C Standard Library I/O functions while implementing your library (this would defeat the purpose of the assignment!). These include functions like `fread`, `fwrite`, `fgetc`, `fputc`, `fseek`. Remember to only create one cache. You will not need to call `malloc` anywhere, except in the place that we already provide for you.
:::
<section>
### Important background on files (very helpful!)
Here are some statements about files that are true for most [Unices](https://en.wikipedia.org/wiki/Unix-like) (UNIX-derived operating systems, such as Linux or macOS), and in particular your course development environment.
<details>
<summary>Expand for details </summary>
1. A file is an ordered sequence of **bytes** - not text, not ASCII characters, not UTF-8 characters, but just bytes. The way we interpret the bytes present in a file leads to a file's colloquial "type" (like a text file, or a CSV, or a compiled binary). To this end, file extensions (`.txt`, `.csv`, `.html`, `.c`, `.exe`) are largely irrelevant. They merely serve as hints as to how their bytes should be interpreted. In fact, there is nothing special about the `.` character in a filename. So rather than thinking about a file called `malte.jpeg` as an object called `malte` of type `.jpeg`, it should be considered to be a sequence of bytes whose name is `malte.jpeg` (additionally, you may take the `.jpeg` suffix to *informally* mean "this probably contains data in the JPEG format and is suitable to be opened by photo viewers").
```
$ gcc helloworld.c -o helloworld
$ ./helloworld
hello world
$ gcc helloworld.c -o helloworld.cool.program.300
$ ./helloworld.cool.program.300
hello world
$ head -c 10 helloworld.cool.program.300 | xxd
00000000: cffa edfe 0700 0001 0300 ..........
```
It's just bytes!
2. The way we interact with files is through file descriptors. A file descriptor is an integer that the operating system uses to identify a file. Any time you want to do something to that file, you pass the operating system the file descriptor as a reference. The way we get file descriptors is with the `open` syscall.
```
int fd = open("myfile.txt", O_RDONLY);
```
From now on, if we want to do something with `myfile.txt`, we will pass the operating system `fd` so that it knows which file to manipulate on our behalf.
3. Once a file has been `open`ed, we can start manipulating it. When a file is open, the operating system keeps track of an index into that file that represents the **"read/write head"** of that file. This is like using your finger to scan across the lines while you read. Wherever the "head" points is the next byte to be read, or if we want to write a byte, it is the location where the next byte will be written.
4. Once we have a file descriptor (which identifies a file), there are three basic operations we can do to modify the bytes within that file.
1. `read(fd, buffer, size)` will read `size` bytes from the file identified by `fd` into the location in memory pointed to by `buffer`. `read` returns the number of bytes that were successfully read from the file, **and then increments the file's read/write head by that number of bytes**.
2. `write(fd, buffer, size)` will write `size` bytes starting at memory location `buffer` into the file identified by `fd`. `write` returns the number of bytes that were successfully written to the file, **and then increments the file's read/write head by that number of bytes**.
3. `lseek(fd, index, SEEK_SET)` will change the value of the read/write head of a file identified by `fd` to `index`. This allows us to "skip" around in a file and read/write from arbitrary locations (we don't always want to read/write sequentially from the start of a file).
**Note**: `lseek` can be called on a position beyond the end of the file (EOF), though this will not change the file's size. If data is written at this position, then the file's size grows to this point and the space between between the old EOF and the written bytes should be filled with null bytes. __*You'll need to consider this edge case in your caching design!*__
</details>
</section>
<section>
## Writing your own regression tests
As you work on your implementation, we would like you to write **at least 5, and at most 10** *interesting* regression tests that we will grade. We define "interesting" tests as those that demonstrate different boundary conditions about using the cache, similar to the `readc` example from [this section](#Step-2-Starting-your-implementation-testing-as-you-go).
Some implementation notes on how the tests work:
- In all regression tests, **the cache is always 8 bytes**. Therefore, you can make assumptions about fetch/flush behavior based on a cache size of 8
- Since we provided `rtest001` and `rtest002`, your graded tests should start at `rtest004` and continue up to `rtest014`. You are welcome to write more than 10 unit tests if you want to help you catch specific bugs, but we'll only grade the first 10.
- Tests do not need to be numbered sequentially--the makefiles will run any test named `rtestNNN` where `NNN` is a 3-digit number. For example, we've provided some extra tests for some more obscure edge cases in the tests numbered 100 and higher.
- We've provided several helper functions in `unit_tests.c` to help with writing tests. Take a look the comments in `unit_test.h` for a description of how these work. For examples, take a look at the existing tests (1-3, and those numbered 100 and higher) for examples.
### What makes a good test?
As you implement the other functions, we encourage you to think of what "interesting" boundary behaviors might help you test your work. A good way to do this is to think about how a test is different *in terms of the cache*. Here are some tips:
- Ideally, tests should cover **a small subset of functionality** to reduce the number of moving parts. This will help you *isolate* what might be broken later!
- **Quality over quantity**: Regression tests should cover **interesting boundary cases** in your cache's behavior, so that you can figure out where problems are occurring. While we could generate an infinite number of tests that read/write different numbers of bytes on different files, this won't tell us what we need to fix--it will just tell us something is wrong. Instead, the goal is to write tests cover different behaviors in how your cache operates, which correspond to different things your code needs to handle. For example:
- Consider when your implementation needs to **flush or fetch the cache from disk**, similar to the [readc example](#Getting-started-testing-as-you-go) from earlier. To write tests like this, consider: what happens when you read or write more data than can fit in the cache?
- Tests that **read/write past the end of file (EOF)** may have lots of interesting behaviors, since this involves different cases in your logic. For example, what happens if your file is 5 bytes, you read 5 bytes, and then write 2 more? The new file should contain those new bytes!
</section>
## Making it fast
Once your design passes the correctness tests, you can begin checking your design's performance by running `make perf`. At minimum, you should aim to pass at least the end-to-end tests before starting to check for performance (but it's okay if you don't have all of the fuzz tests, particularly the complex ones).
**To run the performance tests, run `make perf`**. The performance tests run your implementation and the `stdio` implementation on the same files and compares the relative times for each test. You aren't required to match `stdio`'s performance, but we'd like you to achieve the following:
1. Your implementation is **within 10x** of `stdio` on the `byte_cat` benchmarks (`byte_cat` and `reverse_byte_cat`).
2. Your implementation is **within 5x** of `stdio` on the `block_cat` tests (`block_cat`, `reverse_block_cat`, and `random_block_cat`).
:::danger
:warning: :warning: :warning: **Warning**: Test performance can vary significantly from system to system, especially across operating systems and when using container environments like Docker, which can add a lot of overhead to I/O operations on MacOS and Windows. Two important things to keep in mind:
- **Always verify your performance tests on the grading server BEFORE optimizing too much**, or before submitting. You may find that tests pass on the grading server and fail on your system, or vice versa! If this happens, you should trust the grading server's results, which are what we will use when grading. The differences can be quite dramatic (sometimes >50x!), depending on your system--here's an example:

- **You may receive warnings from the testing framework that your `stdio` tests completed too quickly** to be considered accurate. If this happens, you can try increasing the filesize as suggested (`make check FILESIZE=16M`), but if this fails **just try on the grading server**, which will be more accurate.
<br />
We've done our best to try and control for performance issues, but there are a lot of differences between operating systems and container environment configurations that can affect things. If you're curious and want to help, see the [Extra credit](#Extra)--we'll give you some points if you help us do some testing!
:::
If your implementation beats `stdio` on some benchmarks, we will award extra credit. See [Extra Credit](#Extra-Credit) for more information.
# Testing
## Overview
Our stencil contains four different types of tests to help check your work in different ways. Most of the tests are **correctness** tests (`make check`)--there are three types of correctness tests.
- **Regression tests** (`make check-regression`): like the example test we just created, these are small tests to check tiny small pieces of functionality (e.g., "fetching after reading the whole cache in `readc`") to help you pinpoint if specific parts of your code are working.
- **Fuzz tests** (`make check-fuzz`): are more comprehensive--they perform a large number of random operations on files to check for edge cases or undefined behavior
- **End-to-end tests** (`make check-e2e`) which test your implementation with standard file operations (such as copying between files).
We also provide **performance tests** (`make perf`), which compare your implementation's performance to the `stdio` version.
### Regression tests
Regression tests (`rtestNNN`) are small test programs designed to test small subsets of functionality. You started writing some regression tests in [Step 2](#Step-2-Starting-your-implementation-testing-as-you-go). We also ask that you write a small number of your own regression tests, to help test your design as you add functionality.
See **[this section](#Writing-your-own-regression-tests)** for more information on how to run and work with the regression tests.
### Fuzz tests
The intermediate functionality tests use the `io300_test` program. The program randomly generates a **single file**, which it then opens and performs/tests the specified functions on. The `io300_test` program verifies that each `io300_readc` or `io300_read` call reads the correct bytes from the file, and verifies at the end of the test that all writes are reflected in the final file.
The name of each test specifies the functions tested -- for example, `readc/writec` will perform a combination of `io300_readc` and `io300_writec` calls on the same generated file. You can also parse this information from the command that runs the test (`io300_test` with some arguments), which specifies the test's configuration. (`make check` prints this command with each test when running.) For instance, for `seek_beyond_eof`, the testing script runs:
```
./io300_test readc writec seek -s 0 -m 4096 -n 1000
```
which specifies that the program will randomly generate a file 0 bytes long (`-s 0`), which is allowed to grow to a size of 4096 bytes (`-m 4096`), on which it will then perform 1000 (`-n 1000`) calls to randomly either `io300_readc` or `io300_writec`, each preceded by a call to `io300_seek` to some location between 0 and the maximum file size. Running just `./io300_test` prints a description of the values of these arguments as well. See [this section](#Running-a-single-test) for more helpful tips on running `./io300_test` yourself.
:::warning
**Note:** If you fail fuzz tests (e.g., `readc/writec`) while passing end-to-end tests (e.g., `byte_cat`), the reason is almost certainly that you are not correctly handling operations when both reads and writes happen on the _same_ file.
Make sure that both read and write functions leave the cache metadata in a state that the other function can work with! (In other words, _invariants_ need to be preserved, and -- if appropriate -- restored, by these functions.)
:::
### End-to-end tests
The end-to-end tests use a combination of your `io300_*` functions within larger programs. Most of these programs operate on **separate input and output files**, so there will be two caches (one for the input file, one for the output file).
### Performance tests
`make perf` tests your implementation for speed and compares it to `stdio` on the end-to-end tests.
:::info
**You will find that the correctness tests already pass on the stencil code!** This is because the stencil code contains a copy of a naive implementation that _always_ makes system calls for every operation (i.e., there is no caching).
The stencil code will **not** pass the performance tests. You also cannot simply hand in the stencil code and receive the 60% credit for correctness ;-)
:::
The performance tests will run very slowly in the unmodified stencil code (e.g., on an M2 Apple MacBook Air, many of the tests take over a minute to run). You will need to make them run faster by implementing caching!
:::warning
**⚠️ Important note on performance ⚠️**
Performance can vary across computers. The Docker container adds additional overhead when you run locally, and there are differences in architecture (Apple Silicon vs. Intel Machines) and software (Windows vs. macOS vs. Linux) that affect the speed at which the performance tests run.
We have made efforts to make the tests as consistent as possible, but ***please always check your performance on the grading server once the performance tests pass locally***. We will ultimately grade you based on the performance on the grading server!
:::
## Working with tests
The end-to-end correctness and performance tests will run your implementation on each specified test program using a randomly-generated file of a certain size. For your own personal debugging use, we've provided you with the tools to easily generate these testing files.
### Generating test data
If you wish to generate random testing data, use `make check_testdata`, which generates 80 KiB of data to test for correctness, and `make perf_testdata`, which generates 1 MiB of data to test for speed. These files will be located at `/tmp/check_testdata` and `/tmp/perf_testdata`, respectively.
### Running a single test
You can run a single test for performance as follows:
```shell
$ make -B IMPL=student
$ make perf_testdata # generates 1 MiB performance test file
$ time ./byte_cat /tmp/perf_testdata /tmp/testout
...
```
The following is an example of running a simple test for correctness:
```bash
$ rm -f /tmp/testout # Remove any existing output files
$ ./byte_cat test_files/tiny.txt /tmp/testout # run test (you pick a sample file)
$ diff test_files/tiny.txt /tmp/testout
# no output expected, as the files should be the same!
```
You can also run the `io300_test` program yourself. Its basic features are described in the [Fuzz Tests](#Fuzz-tests) section, but there are a couple more features to help you with testing. You can run the `io300_test` program with a pre-made test data file, by using the `-i` flag. You can also use the `--no-cleanup` flag to preserve the files created by the test:
```bash
$ ./io300_test readc -i test_files/large.txt -n 1000 --no-cleanup # run test, preserving files
$ diff /tmp/io300_expected /tmp/io300_output
# no output expected, as the files should be the same!
```
By default, `io300_test` uses the same fixed seed every time to determine the random operations to run, so you can expect the same output from two identical calls to `io300_test`. However, during testing, it may be helpful to override this default behavior and use your own custom random seed, which is detailed [here](#Debugging-fuzz-tests).
### Advanced testing
For a more complex test, you may need to generate intermediate output files. See `correctness_tests.py` for examples!
```bash
$ ./reverse_byte_cat /tmp/check_testdata /tmp/testout # reverse file
$ ./reverse_byte_cat /tmp/testout /tmp/testout2 # reverse file again
$ diff /tmp/check_testdata /tmp/testout2
# no output expected, as the files should be the same!
```
You may also want to write additional tests to test specific features individually of your code, particularly if you plan to implement extra credit features. For more information, see [Appendix II](#Appendix-II-Writing-custom-end-to-end-tests).
# Debugging
:::danger
The easiest way to spend a lot of time on this project is to just write code, or to randomly edit your code, without thinking and debugging carefully. **Make sure you use the below techniques to make your debugging productive!**
:::
Note that the stencil implementation **passes** all correctness tests, but it is very slow! Additionally, you might find that the performance tests pass locally but **not** on the grading server. Tests must pass on the grading server to receive credit.
As you work on the project, you will likely _break_ the correctness tests in your quest to improve performance.
## General tips
Your implementation will use C's provided file I/O functions. The manual pages, accessible by the `man` command in your terminal, provides the authoritative documentation for these functions:
```
man 2 open
man 2 close
man 2 read
man 2 write
man 2 lseek
```
### Using GDB
As you've encountered in previous assignments, GDB is a very useful tool for stepping through your code. To set up `gdb` for a specific test, you can do the following:
* Run the command `gdb [test executable]` (e.g., `gdb byte_cat`)
* Set breakpoints using `b [location]` (e.g., `b io300_readc`)
* Run `r [arguments]` (e.g., `r test_files/tiny.txt /tmp/out.txt`)
* Note that some tests take in more parameters (for example, `block_cat` takes in an extra parameter of block size). You can see what parameters each test takes in by running the test executable with no parameters (e.g., `./block_cat`).
* Additionally, most programs operate on separate in- and out-files, but `rot13` and `io300_test` operate on the same file.
You may also find it helpful to print out the contents of the cache and verify that it matches the steps in your design. In this case, the examine (`x`) command, which allows you to examine the contents of memory at an address, comes in handy:
* `x/<number><format><unit_size> <address>` prints the contents of memory at `address`, using the specified arguments:
* `number` optionally indicates how many contiguous elements of size `unit_size`, beginning at `address`, should be examined. This is very useful for examining the contents of an array. By default, this argument is 1.
* `format` indicates how data should be printed, which in most cases is the same format character you would use in a call to `printf()`. (One exception is the format `i`, which prints a machine instruction rather than a decimal integer.) By default, this argument is `x` (hexadecimal).
* `unit_size` indicates the size of the data to examine. It can be `b`ytes, `h`alfwords (2 bytes), `w`ords (4 bytes), or `g`iant words (8 bytes). By default, this argument is `b` (1 byte).
Thus, to examine the first 10 bytes of your cache in decimal, for an `io300_file* f`, you can run the command `x/10db f->cache` in GDB.
See the [GDB guide](https://docs.google.com/document/d/15tqnbCcs3QH-vPzYbJNJOgZm1PQfZywp4gf2o5wey34/edit) for other useful commands.
### High-quality print statements: dbg()
You will likely want to have debug output in your library that you can disable easily when running performance tests, as `printf`-type functions slow down your program **a lot**. We provide the helper function `dbg()` in the stencil for this purpose, which acts just like `printf()`, but also logs your file's metadata so you can see what is happening as your program executes.
You can change the value of the `DEBUG_PRINT` constant to turn the debug printing code on or off in a single keystroke. `dbg()` works just like `printf()`, but if `DEBUG_PRINT` is set to 0, the compiler ignores and doesn't compile the function call.
Check out the function:
```c=
static void dbg(struct io300_file *f, char *fmt, ...)
```
in `impl/student.c`. When you add fields to your file structure, be sure to include them after the `TODO` in `dbg()`, so that they are also printed out. Here is an example of using it:
```c=
int io300_writec(struct io300_file *f, int ch) {
dbg(f, "writing char: %c\n", ch);
...
```
## Debugging correctness tests
**If you fail a correctness test**, the first thing you will usually want to look into is whether it failed because of a crash or sanitizer-detected error in your code, or whether it ran successfully but produced incorrect output. With each test, `make check` will output the command used to run the individual test - running this command in your terminal will output a more informative reason for why the test failed.
Additionally, **make sure your program can handle non-ASCII characters!** Not all files consist of text; for example, images or videos can contain arbitrary bytes, including the `NUL` byte that has special meaning for text, but not in other data.
### Debugging fuzz tests
Most basic functionality tests will test your implementation using the `io300_test` program, which will randomly generate a file and make a random sequence of calls to specified `io300_*` functions (see [here](#Fuzz-tests) for the full functionality of the program).
If a basic functionality test fails when using `make check`, it's helpful to re-run that test using the same random "seed" that `make check` used to see where the test failed. To do so, you'll first want to examine your output from `make check`, as the top line will tell you what random seed was chosen:
```bash
======= (2) FUZZ TESTS =======
RANDOM SEED FOR THIS RUN: 4223581375
...
```
Then, when running `io300_test` yourself, include the `-r` flag with your other parameters:
```bash
./io300_test readc writec seek -s 0 -m 4096 -n 1000 -r 4223581375 # set the random seed
```
This seeds the random number generator with a fixed number, so the randomness is always the same and the test's execution becomes deterministic.
Then, you'll want to use [GDB](#GDB) to find out which instruction fails and how. To make it easier to debug with GDB, we also recommend that you find an instance of the test failing using a small file that you created yourself and passed in with the `-i` flag (see [Running a single test](#Running-a-single-test)), and using a small number of tested operations (the `-n` flag).
To do so, first use `gdb` on `io300_test` to determine which number operation fails (i.e. `i` in `test_operations`):
1. Open `gdb` on `io300_test` and set a breakpoint on the print statement of the received error message.
2. Once you've reached the breakpoint, use `bt` to print out the backtrace of previously made function calls, and find the frame number of `test_operations`.
3. Switch to the frame of `test_operations` via `frame <frame_num>`, and then find/print the value of `i`.
You can then set a conditional breakpoint for that specific operation by setting a breakpoint in `test_operations` for that specific value of `i` (i.e. `b io300_test.c:262 if i == <num>`), and then set a breakpoint for the relevant `io300_*` functions and step through from there to analyze what went wrong. (You can also use this technique to analyze the `io300_*` function calls before this failed one.)
Once you've fixed all issues with your tests, you can also run all tests with the seed you were using by passing it to `make check`:
```bash
$ make check -B SEED=4223581375 # run test with specific seed
```
### Debugging end-to-end tests
All end-to-end tests (besides `rot13`) copy data from one input file to separate output file. If these test programs fail, but successfully run individually, this indicates that the input and output files' contents differed. In this case, it makes sense to work out **how** they're incorrect, by looking at the actual bytes in the input and output files!
Below we've detailed some helpful tools/commands, such as `xxd` and `diff`, to analyze file contents.
Additionally, it can also help to look at the output from [`strace`](#Debugging-performance-tests), which lists the system calls that your caching I/O library makes, to see if anything unexpected happens during the test.
#### Hexdump
`xxd <file>` allows you to view the contents of binary files. This will be helpful when you have a buggy implementation and you want to see what is going wrong, by printing out what's in your result file. The code below demonstrates an example:
``` shell=
$ echo 'this is ascii' > out.bytes
$ xxd out.bytes
00000000: 7468 6973 2069 7320 6173 6369 690a this is ascii.
$ dd if=/dev/urandom of=out.bytes bs=32 count=1 # generates 32 random bytes
1+0 records in
1+0 records out
32 bytes copied, 0.000336055 s, 95.2 kB/s
$ xxd out.bytes
00000000: 65b7 6c53 69f3 f1ed e6d2 09eb ec66 9403 e.lSi........f..
00000010: f33c e929 d703 314f e7dd 5e6b 56a0 2d28 .<.)..1O..^kV.-(
```
The tests operate on very large files, where `xxd` will flood your screen with output. In this case, `head -c <num> | xxd <file>` or `tail -c <num> | xxd <file>` give you a peek at the `<num>` bytes at the beginning or end of a file.
#### Diff
`diff <file1> <file2>` will tell you if and how the two inputted files differ. This may again be helpful when you have a buggy implementation and you want to figure out where in the output file you're differing from the expected content.
#### Other commands
* `wc -c <file>` displays the number of bytes in a file.
* `du -h <file>` also displays the size of a file and is better for large files (it gives human readable byte numbers).
## Debugging performance tests
**If your performance is poor**, `strace` should be your first point of call. Poor performance in this project is almost always explained by your implementation making too many system calls. `strace` is a tool that provides diagnostic information about the system calls a program makes.
Running tests under `strace` will help you understand exactly what sequence of system calls happen, and how many bytes they move into and out of the cache.
**Note**: `strace` and sanitizers don't mix well together - you'll want to recompile without sanitizers (`make -B IMPL=student SAN=0`) before running `strace`.
:::info
<details><summary><em>Expand for a more complete description of strace!</em></summary>
`strace` (on Linux) allows you to view the system calls that a program makes. To run `strace` on a given program, run `strace <command to execute program>`. For example, to run `strace` on `byte_cat` with `words.rot13.txt` as an input file, run the following in the terminal:
```
strace ./byte_cat test_files/words.rot13.txt /tmp/out
```
This will print to your terminal a list of *all* system calls made, with their arguments and their return value. As quite a lot of these are irrelevant for our analysis, we'll often want to look into how many times a program makes a *particular* system call.
We can use the `trace` option to limit the syscalls tracked to a single one. For instance, to see the `read` system calls made for the `naive` implementation, we can run the following:
```shell=
$ make -B IMPL=naive SAN=0
$ strace -e trace=read ./byte_cat test_files/words.rot13.txt /tmp/out
read(3, "\177ELF\2\1\1\0\0\0\0\0\0\0\0\0\3\0>\0\1\0\0\0\260\v\2\0\0\0\0\0"..., 832) = 832
[...]
read(3, "1", 1) = 1
read(3, ".", 1) = 1
read(3, "1", 1) = 1
read(3, " ", 1) = 1
read(3, "V", 1) = 1
read(3, "a", 1) = 1
read(3, " ", 1) = 1
read(3, "g", 1) = 1
[...]
```
We can also use `grep` and `wc` to process the input of `strace` to see simply how many times a certain system call is made:
```shell
$ wc -c test_files/words.rot13.txt
755 test_files/words.rot13.txt
$ make -B IMPL=naive SAN=0 byte_cat
gcc -ggdb3 -Wall -Wextra -Wshadow -std=gnu11 test_programs/byte_cat.c impl/naive.c -o byte_cat
$ strace ./byte_cat test_files/words.rot13.txt out.txt 2>&1 | grep read | wc -l
804
$ strace ./byte_cat test_files/words.rot13.txt out.txt 2>&1 | grep write | wc -l
758
$ make -B IMPL=stdio SAN=0 byte_cat
gcc -ggdb3 -Wall -Wextra -Wshadow -std=gnu11 test_programs/byte_cat.c impl/stdio.c -o byte_cat
$ strace ./byte_cat test_files/words.rot13.txt out.txt 2>&1 | grep read | wc -l
50
$ strace ./byte_cat test_files/words.rot13.txt out.txt 2>&1 | grep write | wc -l
4
```
Notice how the naive implementation makes around 750 reads and writes (this makes sense because the naive implementation calls `read()` and `write()` once per character, and `words.rot13.txt` is 755 bytes long) while the stdio implementation makes **<10% fewer read and write calls**.
</details>
::: warning
**Note from Your TAs:** Although using`strace` may seem intimidating, it is incredibly useful in improving performance! In particular, it can help you visualize the sequence of system calls.
:::
Consider also writing your own performance tests if you want to test specific behavior. For more information, look at [Testing](#Testing) and [Appendix II](#Appendix-II-Writing-Custom-Tests).
# Extra Credit
You can receive extra credit by achieving impressive performance or completing project extensions. If you are a graduate student taking CSCI 1310, please implement and document **at least one** specific optimization or extension.
**To get extra credit for impressive performance,** you should meet or beat the performance of `stdio` on a few benchmarks. You should also explicitly document the strategies or the changes you made to achieve in the extra credit section in your README file. **Up to 10 points of extra credit will be awarded**.
**To get extra credit for project extensions**, take a look below!
#### Help us improve performance!
**Super easy (2 pts).** As we've mentioned, the performance tests can have very different results between systems, due to Docker implements file operations across different operating systems. We're working on improving our tests to account for this, but we need your help! We'll give you some extra credit if you run a script for us that measures your system's performance when running the `stdio` implementation, and then upload your results. (Note that the benchmark does *not* run your code, just `stdio`, because we're trying to test our baseline!)
By running the tests, you'll also get to see how your system performs and can draw some inference on how the `stdio` version does caching. After the project ends, we'll plot everyone's results and post it EdStem, which should be pretty cool!
<details><summary> <b>Expand for instructions! </b> </summary>
To load and run the benchmark, do the following:
1. In a terminal in your container environment, run the following command from your `fileio` directory (i.e., where you normally run `make check`):
```
python3 test_scripts/benchmark.py
```
You should now see our script running! The benchmark script is similar to our performance test scripts, except that it also tests many different permutations of file sizes and filesystem options, so we can see how the runtime changes with larger files. Overall, our goal is to try and find a good file size to use for the tests that 1) doesn't take too long to run, but 2) still produces accurate results. Your results will help us see what file sizes work well for all students!
The benchmark should take at most 15min to run to completion. While it runs, take a look at the run times as file sizes increase--you might see some interesting things! (Is it always linear?)
3. When the benchmark finishes, it will write a file `benchmark.json` into your `fileio` directory. To receive your points, **[fill out this form](https://forms.gle/iVKrDbEwmLuNDdt36)** and upload your `benchmark.json` file, and feel free to add any comments about the process.
Thanks for your help!!! After the project ends, we'll we'll plot everyone's results and post it EdStem, which should be pretty cool!
</details>
#### Adaptive Caching
**Easy**. Detect the direction of access within a file (i.e., are the reads occurring in forward or reverse?) and adapt your caching strategy to pre-fetch that data. Measure how much of an impact adaptive caching has on performance over your basic implementation by creating additional test programs in `test_scripts/correctness_tests.py` and `test_scripts/performance_tests.py`. Document how you implemented adaptive caching and its performance impact in your README file.
#### Diabolical `byte_cat`
**Moderately easy**. Check out the `diabolical_byte_cat` test program. This test program works similarly to `byte_cat`, but tries to throw off your cache by doing some gratuitous seeks!
Edit `test_scripts/correctness_test.py` and uncomment `diabolical_byte_cat` as part of the end-to-end tests (at the bottom of the file), and do the same in `test_scripts/performance_test.py`. Now optimize your code to handle the situations that this test program creates. Your code should beat `stdio` and pass the correctness tests. Explain why your implementation is faster than `stdio` for `diabolical_byte_cat` in your README file.
#### Detecting Strides
**Moderately difficult**. Have your cache detect "strides", or access patterns that jump by fixed amounts within a file. For example, reading byte 1, then byte 1001, then byte 2001, and pre-fetching appropriately. Measure how much of an impact detecting strides has on performance over your basic implementation by creating additional test programs in `test_scripts/correctness_tests.py` and `test_scripts/performance_tests.py`. Document how you implemented stride detection and its performance impact in your README file.
#### Memory-Mapped I/O
**Difficult**. Research "memory-mapped I/O" and how it works, then use it in your implementation when possible. Measure how much of an impact memory-mapped I/O has on performance over your basic implementation by creating additional test programs in `test_scripts/correctness_tests.py` and `test_scripts/performance_tests.py`. Document how you implemented memory-mapped I/O and its performance impact in your README file.
---
# Submitting your work
### Submission instructions
As in previous projects, you will submit your work on the grading server by pushing to your repository. To submit your work, be sure to:
1. Commit and push all of your code
2. Fill out `README.md` in the `fileio` directory of your project repository, and commit and push your changes. If thoughts on any bugs or tests you couldn't solve, or there are other details about your work you want us to know when grading, please note this in your readme in the "design overview" section.
<details>
<summary> <span> Remind me again what the <code>README.md</code> should contain?</span> </summary>
<br>
The <code>README.md</code> file will include the following:<br />
<ol>
<li>Any design decisions you made and comments for graders, under <i>"Design Overview"</i>. If there's nothing interesting to say, just list "None".</li>
<li>Any collaborators and citations for help that you received, under <i>"Collaborators"</i>. CS 300 encourages collaboration, but we expect you to acknowledge help you received, as is standard academic practice.</li>
<li>Any extra credit attempted.</li>
</ol>
</details>
### Grading breakdown
:::danger
While the project is about speed, **correctness is more important than performance**!
We will not award credit for performance tests that pass if you fail the corresponding correctness tests, but we will be generous with partial credit if you pass correctness tests and fail to meet performance goals.
To understand why, consider an implementation that always throws all data away: this would be infinitely fast and meet all the performance goals, but of course it isn't a useful caching I/O library!
:::
Your grade will be determined as follows:
* **Correctness (60 points)** for passing the correctness tests. You will receive 8 points total for your regression tests, and then each fuzz test is worth 1 point, each end-to-end test is worth 2.4 points, and you will receive 0.6 points for passing them all.
- Your implementation must take advantage of the cache in order to receive credit. (The stencil version already passes the correctness tests, but doesn't use the cache--you can't submit this for 60 points :wink:)
- If you couldn't pass certain correctness tests but spent time debugging them, we will give partial credit if you can make a small regression test that replicates the behavior of the bug. If you want to be considered for this, please describe the bug and the test (including its test number) in your README.
* **Peformance (40 points)** for meeting the performance goals: your `byte_cat` runs must be **within 10x** of the `stdio` runtime, and your other runs (`block_cat`, etc.) must be **within 5x** of the `stdio` runtime. Each benchmark is worth 6.5 points, and you get 1 point for passing them all.
- We will award partial credit if you miss the target but improve over the naive implementation. You will not receive credit for good performance on benchmarks that fail the correctness tests; it is more important to be correct than to be fast.
- Tests pass on the grading server to receive credit. Please check your work on the grading server frequently to be sure it passes the tests.
* **Up to 10 points** of extra credit for performance or project extensions. See [Extra Credit](#Extra-Credit) for more information.
**Graduate students taking CSCI 1310** should also implement and measure **one** performance optimization, and describe it in their README. Make sure to cover, in a few sentences, what the optimization is, why you expected it to improve performance, and whether it did or did not improve performance in your experiments.
Now head to the grading server, make sure that you have the "Caching I/O" page configured correctly with your project repository, and check that your tests pass on the grading server as expected. (You might find that the performance tests pass locally but **not** on the grading server. Tests must pass on the grading server to receive credit.)
**Congratulations, you've completed the third CS 300 project!** :page_facing_up:
# Appendix I: Implementation Swapping
This section explains how our test programs can use different implementations that match the `io300.h` API.
Consider the following to be our test program:
```c=
#include <stdio.h>
// extern means:
// "I'm not defining this function here, but someone
// else (another source file) will have to define it
// before the program is executed"
//
extern int getRandomNumber();
int main() {
printf("%d\n", getRandomNumber());
}
```
Now we want an implementation of the `getRandomNumber` function that we can link with the test program to produce a fully functional number printer.
```c=
// real-rand.c -- delegate to C standard library (man 3 rand)
#include <stdlib.h>
int getRandomNumber() { return rand(); }
```
```c=
// my-rand.c -- our own implementation (very fast)
int getRandomNumber() { return 4; }
```
Now when we compile the main test program, we have a choice. Since both implementations conform to the same public API (namely, they provide one function `getRandomNumber :: void -> int`), either can be swapped in and the main program won't know the difference.
```shell=
$ gcc test-prog.c real-rand.c && ./a.out
16807
$ gcc test-prog.c my-rand.c && ./a.out
4
```
This is the principle behind the different implementations for this project, but instead of the public API being a single function, it is a family of IO related functions defined in `io300.h`
At a high level, to test your implementation, we will be doing something like this:
```shell=
$ gcc our-test-program.c impl/stdio.c && time ./a.out
$ gcc our-test-program.c impl/naive.c && time ./a.out
$ gcc our-test-program.c impl/student.c && time ./a.out
```
to compare the speed of your implementation against the provided ones.
# Appendix II: Writing custom end-to-end tests
To test small subsets of functionality, we recommend writing small regression tests that match the behavior you're trying to check--for details on this, please see [here](#Writing-your-own-regression-tests).
If you want, you can also create your own larger test programs that can be run as end-to-end or performance tests. This is not required, but you might want to do it to test certain features, particularly certain extra credit optimizations.
Creating a test has two steps: writing a test program, and adding it to our testing scripts.
## Creating a new end-to-end test
Let's create a test program, `student_test.c` which opens a file, checks its filesize, and writes out an equivalent number of Zs to an output file.
To create this custom test:
1. Create a new test file, `student_test.c`, in the `test_programs` folder:
```c=
#include <stdio.h>
#include "../io300.h"
int main(int argc, char *argv[]) {
/* our test takes 3 arguments: program, infile, and outfile
* if the wrong number of arguments is provided, this test fails! */
if(argc != 3) {
fprintf(stderr, "usage: %s <in-file> <out-file>\n", argv[0]);
return 1;
}
// open our input file, as we need to read its contents
struct io300_file *in = io300_open(argv[1], MODE_RDWR, "student test infile");
// if our input file doesn't exist, this test fails!
if (in == NULL) {
return 1;
}
// open our output file
struct io300_file *out = io300_open(argv[2], MODE_RDWR, "student test z-ified outfile");
// if our output file couldn't be opened, this test fails!
if (out == NULL) {
io300_close(in);
return 1;
}
off_t const filesize = io300_filesize(in);
// if we can't determine the input filesize, this test fails!
if (filesize == -1) {
fprintf(stderr, "error: could not compute filesize\n");
io300_close(in);
io300_close(out);
return 1;
}
io300_close(in);
// write out our Zs!
for (int i = 0; i < filesize; i++) {
// if a write fails, this test fails!
if(io300_writec(out, 'Z') == -1) {
fprintf(stderr, "error: write should not fail.\n");
io300_close(out);
return 1;
};
}
io300_close(out);
// if nothing went wrong, our test passed!
return 0;
}
```
2. Add your test name to the Makefile
In order to create the binary for this test, add its name (for this example, `student_test`) to `TEST_PROGRAMS` in the project Makefile. This will make sure this new test gets built along with the existing autograder tests when `make` is run
3. Test$^2$ -- Test your test!
A bad test can be very misleading, leading you to think that your code is failing when in actuality it may be completely correct. Try running your test manually on sample files from `test_files`, on the `naive` and `stdio` implementations, and triple check that everything seems to work as intended.
## Adding a new end-to-end test to the testing scripts
This project has autograders for both correctness (`test_scripts/correctness_test.py`) and performance (`test_scripts/performance_test.py`). Most tests are defined in the correctness test script. To add a new test:
1. Open up `test_scripts/correctness_test.py` and define a new test class near the others, like this (see the comments for details):
```python=25
def student_test(infile, outfile, outfile2):
# create an file equal in size to infile of all Zs (manually);
# (you don't need to understand this!)
assert shell_return(f"printf '%*s' $(cat {infile} | wc -c) | tr ' ' 'Z' > {outfile2}") == 0
# check if our test passes, and if the output file is correct
return shell_return(f'./student_test {infile} {outfile}') == 0 \
and files_same(outfile, outfile2)
```
The test class has three functions:
- `bin_path` must return the name of the test program (here `./student_test`)
- `run_cmd` returns the command the script uses to run the actual test
- `check` is used to check if the output is correct. If you leave this blank, a default version will just check if the input and output files are equal
2. Add the new test to the list of end-to-end tests at the bottom of `correctness_test.py`, like this:
```python
all_e2e = {
'byte_cat': TestByteCat(),
# . . .
'rot13': TestRot13(),
'student_test': TestStudentTest(), # <--- NEW!
}
```
5. Huzzah: our test is complete! Running `make check-e2e` should provide the results of your custom test, which hopefully passes :)
```
. . .
17. student_test
-> ./student_test /tmp/io300/infile /tmp/io300/outfile
-> printf '%*s' $(cat /tmp/io300/infile | wc -c) | tr ' ' 'Z' > /tmp/io300/expected
PASSED!
Your results follow, indicating if each test passed or failed.
======= TEST SUMMARY: END-TO-END TESTS =======
Implementation tested: naive
byte_cat: PASSED
. . .
rot13: PASSED
student_test: PASSED
```
If you'd like to also add your test as a performance test, see the next section.
### Adding to the performance tests
To add a new performance test, open up `test_scripts/performance_test.py` and do the following:
1. Add the name of your new test class to the import statement at the top of the file:
````
from correctness_test import TestSpec, TestByteCat, TestReverseByteCat, \
TestBlockCat, TestReverseBlockCat, TestRandomBlockCat, \
TestStrideCat, TestDiabolicalByteCat, TestStudentTest
````
2. In the `run` function at the bottom of the file, add your test to the `TESTS_TO_RUN` dict, like this:
```
TESTS_TO_RUN = {
'byte_cat': TestByteCat(),
# . . .
'stride_cat': TestStrideCat(1, 1024),
'student_test': TestStudentTest(), # <--- NEW!
}
```
3. To try out your test, run `make perf`! You should now see it in the test results
This test was just one sample test you could write. All of our tests are available in `test_scripts/`, so feel free to reference them in creating your own.
:::danger
**Be careful when modifying tests or the testing scripts**, as changing existing tests could lead to misleading results. To confirm your tests results (for the tests we provide), please check your results on the grading server.
:::
---
<small>_Acknowledgements:_ The IO project was developed for CS 300.</small>